
TL;DR
Need to keep a perimeter or partial run standing through tonight’s wind or tomorrow’s inspection—without pouring new footings? These field-tested bracing moves give you hours to days of stability while staying inspector-friendly: short returns at 24–32 ft intervals, double-braced corners, kicker braces at gates and signboards, base linking so panels act as one unit, and bottom control (tension wire or weighted base bars) that kills lift-through. Each hack is reversible, fast, and plays nicely with Austin soils and gust fronts. To see how we stage these on real sites, browse our Austin projects.
When you need a “time-buy” brace (and when you don’t)

Temporary bracing is for short windows—storm nights, an inspection morning, or keeping a partial run safe until the permanent crew lands. It is not a substitute for proper footings or undersized posts. If your posts are obviously underset, rails crushed, or the line is visibly racking, call for a permanent fix. (If you need the permanent path mapped, our team can align the temp geometry with the future layout via our fence installation services in Austin so you aren’t paying twice.)
Good candidates for “time-buy” bracing
- Panelized chain-link perimeters (events, construction, infill lots).
- Freshly set posts need 24–48 hours to load fully.
- Long straight faces that took on screens late in the game.
- Gate zones or signboard segments that have just started to creep.
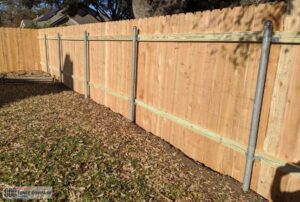
Core geometry: returns, corners, and interval rhythm
Think triangles and breaks. Straight, uninterrupted faces rack and tip under gusts or lever attacks.
- Returns: Add a short perpendicular return every 24–32 ft on exposed runs. Keep them square and tight to the main line.
- Corners: Treat corners like mini-structures—double-brace them and, if panelized, double the ballast.
- Interval rhythm: On 8–10 ft panel runs, place an interval brace every 3–4 panels; on framed temporary wood/iron segments, brace at each post that precedes a long span or a screen change.
- Stairs over ramps: Step with grade—don’t leave large bottom gaps that act like wind scoops.
If you’re weighing panel duty or fabric options for a durable temporary setup (panels that actually accept braces and holds), see our local chain-link fence configurations for Austin—we pull from the same commercial-duty frameworks for temp and semi-permanent runs.
Kicker braces that pass inspection
A kicker is a diagonal brace that pushes against the ground or a base to resist racking. Done right, kickers look tidy and read “intentional” to inspectors.
- Angle: 35–55° off the vertical is the sweet spot—steep enough to carry a load, shallow enough not to trip.
- Ends: Use cup/foot ends or a plate—no sharp cut tube into turf.
- Anchorage: On hardscape, land kickers on ballast blocks; in soil, use a stake pin or screw anchor.
- Placement: Install at gate posts, corners, returns, and signboard spans first.
- Visibility: Paint high-vis tips if they sit near a public path; inspectors like safe, noticeable markings.
Base management: linking feet and stopping panel “walk”
Lots of failures happen because a single foot “walked” a few inches.
- Link adjacent bases with short bridge bars or sandbag spans so panels act as one unit.
- Square the bay: If a face bows, reset the two nearest feet to create a flat line—then link.
- Low profile: Keep links low and tight so they don’t trip pedestrians or snag tires.
Bottom control: tension wire, weights, and skirts
Lift-through is the quiet breach inspectors hate and thieves love.
- Tension wire: Add 7-ga galvanized or vinyl-coated wire with hog rings every 6–8 in. along public edges.
- Weighted base bars: If the wire won’t fit your base design, use weighted rails or sandbag chains; keep the weight low and continuous.
- Skirts: For tool cribs or high-value zones, add a skirt (sheet or close-mesh) at the bottom bay to prevent reach-through.
- Reveal: Over hardscape, hold ~1–2 in. under-gap; step to 2–3 in. through swales so water has a path.
Screens and sail math (the fastest way to lose a fence)
Screens are great for optics and dust control, but they add sail area—which multiplies loads.
- 50–60% mesh is the default; minimal extra bracing needed.
- 70–80% mesh looks premium but demands returns every 24–32 ft, double-braced corners, and kickers on long spans.
- 90%+ blackout belongs only on short, anchored segments; never run it down an open parking-lot edge.
- Relief windows: Carve small open windows near gatehouses and corners so gusts spill out before the brace sees it all.
For deeper wind/ballast planning paired with these bracing hacks, our Austin guide to construction fence wind and ballast strategy walks through spacing that survives storm nights.
Gates & signboards: the trouble spots
- Double swings: Use a center receiver sleeve so leaves meet cleanly; add rollers to heavy leaves.
- Lock plan: Set a single lock height across gate locations; inspectors and night patrol love consistency.
- Signboard spans: Any banner or plywood face? Treat it like a sail—kicker brace both posts and link bases.
- Ped gates: Add closers at public edges to prevent leaves from drifting into queues or ADA paths.
Drainage, slopes, and Austin clay
- Bell-bottoms win: For temporary posts in expansive clay, small bell-bottomed holes resist pop-out far better than straight tubes.
- Step the line: “Stair-step” the fence with the grade; long ramps create both wind scoops and toe-holds.
- Swales: Increase under-reveal to 2–3 in. at swales and add weighted base bars so water can pass without lifting the fabric.
- Irrigation: Where sprinklers hit metal, plan zinc-rich touch-ups on field cuts and hardware swaps.
Austin-tuned specs box (copy/paste)

- Panel geometry: 8–10 ft panelized chain-link or framed temp bays; returns every 24–32 ft on exposed runs; double-braced corners.
- Kickers: 35–55° angle; land on ballast blocks (hardscape) or stake/screw anchors (soil).
- Interval braces: Every 3–4 panels on 8–10 ft heights or where screens/signboards mount.
- Base linking: Bridge adjacent feet so bays move as one; keep links low and tight.
- Bottom control: 7-ga tension wire with hog rings at 6–8 in. o.c., or weighted base bars. Under-gap ~1–2 in. (2–3 in. at swales).
- Screens: Default 50–60%; if 70–80%, add returns/kickers and double-braced corners; avoid long blackout runs.
- Gates: Double swing with receiver sleeve; rollers on heavy leaves; closers on ped gates; standardized lock height.
- Finishes & fasteners: Stainless/HDG near irrigation; keep zinc-rich primer + compatible topcoat in the kit for touch-ups.
Cost levers that make a difference this week
- Brace less, brace smarter: Returns at the proper spacing, beats random extra blocks.
- Hybrid stability: Anchor corners/returns, ballast straights—best holding power with minimal surface damage.
- Targeted screening: Wrap street-facing runs and signbackers; skip long interior faces.
- One lock height: Faster patrols, fewer misses, fewer cut-and-replace moments.
- Spare kit on site: Clamps, ties, sleeves, sandbags, zinc primer, compatible topcoat—cheap insurance at 2 A.M.
One-hour stabilization plan before wind or inspection
- Walk the face (5 min): Mark corners, long straights (>24–32 ft), gate zones, signboards, and any screened runs.
- Drop returns (10 min): Install short perpendicular returns at 24–32 ft intervals on exposed runs.
- Double the corners (10 min): Add a second brace and extra ballast/anchors at each corner.
- Kicker the trouble spots (10 min): Set kickers at gates and signboard spans; land on blocks (hardscape) or stake/screw anchors (soil).
- Link the feet (10 min): Bridge adjacent bases so bays act as one unit.
- Control the bottom (10 min): Add a 7-ga tension wire with hog rings every 6–8 in., or lay weighted base bars; set under-gaps to ~1–2 in.
- Gate alignment (5 min): Add rollers/receiver sleeve, standardize lock height, and test self-close.
- Final check (5 min): Step panels with grade; verify sight triangles at exits; mark any kicker tips near public paths.
Maintenance cadence while you wait for permanent work
- Daily: Check gates’ latches and closures; quick look at corners, returns, and signboard spans.
- After wind/rain: Re-seat ballast; re-tie at gates and braces; confirm base linking hasn’t popped.
- Weekly: Verify under-gaps, touch up cuts with zinc primer + topcoat, and sweep ADA paths so kickers aren’t trip hazards.
- When screens go up: Install the planned returns/kickers the same day—don’t let a storm test your math.