
TL;DR
A late-spring squall line hammered a Round Rock backyard: panels blew out, posts tilted, and the driveway gate racked so badly it wouldn’t latch. The fix wasn’t just “new boards.” The winning plan combined rapid stabilization, drainage corrections, selective re-posting with crowned collars, core-drilled footings at shallow limestone, wind-friendly panel layout, and a gate rebuild tuned for summer expansion. The result is a straighter, calmer fence line that dries quickly after storms and stays square through clay-swell cycles—without over-replacing good sections.
Project Snapshot
An overnight line of thunderstorms rolled across Williamson County. Gust fronts hit from the southwest, then wrapped from the west—classic microburst behavior. In the morning, three sections lay bowed into the yard, two end posts had shifted, and the side-yard gate scraped the concrete. With Atlas Fence Company leading the first walk, the team looked past the obvious broken boards and mapped the path water took, the places wind concentrated, and the soil/rock constraints that would dictate how we rebuilt.
Homeowner priorities were a top priority and clear:
- Secure the yard promptly (for the safety of pets and the pool).
- Replace surgically—not a wall-to-wall gut—while upgrading weak details.
- Maintain a look that complements the neighborhood’s neutral palette.
- Make the line storm-quiet so it stops moving after heavy rains.
First 48 Hours: Triage, Safety, and Temporary Containment
Storm jobs are two projects: make it a valuable investment that is safe today, then make it durable for years.
- Temporary braces—2×4 kickers on the worst leaners—stopped progressive failure.
- A short run of temporary panels closed gaps, allowing dogs to stay in and the pool zone to remain secure.
- Debris triage: We cut and stacked broken boards away from the work path, saving intact rails for measurement templates.
- Quick-look drainage: noted ponding near two downspouts and a low saddle where runoff funneled at the gate bay.
If the fence had been mostly intact, targeted repairs could have bought time; in this case, the combination of lean, broken fabric, and gate misalignment argued for a deeper scope. Where whole sections were still sound, we preserved them and focused dollars where failure began.
Jobsite Realities in Round Rock (Clay, Limestone, and Storm Winds)
Round Rock’s soils aren’t uniform. East-side neighborhoods are characterized by expansive clays that absorb water and heave when saturated. West-side and hilltop pockets hit the limestone shelf within 12–20 inches. Storms bring two repeat offenders:
- Wind loading: long privacy runs act like sails. When gust fronts swing 30–50 mph, a slightly racked panel becomes a lever on soft posts.
- Sheet flow: short cloudbursts push water across side yards toward the back fence, undermining posts on the low side and soaking board toes.
Designing the replacement meant solving for both, not just swapping lumber.
Root-Cause Walkthrough: Why This Fence Failed

A clean case study begins with the cause, not the symptoms. We found four:
- Flat-topped collars at posts. Water collected at the wood-concrete interface. In clay, that’s a soak-and-swell machine that loosens everything.
- Shallow embedment over rock at the rear corner. The installer hit limestone and shortened the hole rather than using core drilling.
- Long, uninterrupted privacy spans facing the prevailing storm fetch. No breaks, no lattice of stiffness—just full sail.
- Gate bay on a drainage path. Water crossed the threshold during heavy rain, creating mud that dragged the leaf and telegraphed racking into the hinge post.
Once you see those four, the fix writes itself.
Scope & Sequence: From Stabilize to Straighten to Future-Proof
This was not a “tear out 200 feet” job. It was a surgical rebuild:
- Selective demo. Remove only compromised posts/panels, save any straight sections.
- Drainage moves first. Re-cut a shallow swale on the uphill side, add downspout extensions to jump the fence toe, and set a 12–18″ decomposed-granite (DG) mow strip along the worst splash zone.
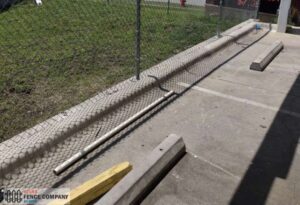
- Re-posting with drainage-smart footings. Each new hole gets a gravel bed and a crowned concrete collar brought 1–2″ above grade, beveled to shed water.
- Rock strategy at shallow limestone. Where probes hit rock at ~16″, core-drill 8–12″ into limestone and set posts with non-shrink grout.
- Wind-friendly panel plan. Maintain visual privacy, but break the longest span with hidden control joints and ensure uniform base gaps to allow storm air to bleed through without requiring crawl-through openings.
- Gate rebuild. New rigid frame, adjustable hinges, threshold pad that sheds water, latch relocated out of the hottest late-day sun.
- Finish. Mid-light, heat-smart stain scheduled in a favorable weather window.
Where continued spot fixes were justified—say, three posts failing in an otherwise good line—we framed that as targeted fence repairs to avoid unnecessary replacement. Conversely, where age and material mismatch would leave a patchwork, we shifted our scope to complete fence installation for those runs, so the line reads as one cohesive system.
Footings That Don’t Become Bathtubs
Most post failures start at the ground line. We treat that area like a roof detail, not an afterthought.
- Gravel bed (6–8″ of clean, compacted rock) under each post drains the socket and resists pumping in clay.
- Concrete collars are crowned above grade, sloped away so water has nowhere to sit.
- No encasement of wood below grade; we keep wood out of permanent wet pockets.
- Core-drill in rock rather than accepting shallow holes; grout bonds the post to limestone for excellent lateral resistance.
- Avoid mixed-metal stacks that promote corrosion at the collar.
When you crown collars, the difference is immediate: after a storm, the fence toe is dry in hours, not days.
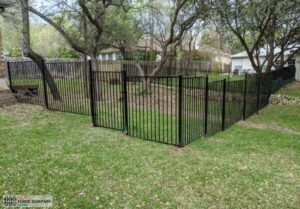
Panels & Layout: Reducing “Sail” Without Killing Privacy
Privacy fences can be wind-quiet if you detail them thoughtfully for security :
- Uniform 2–3″ base gap presents a small relief path for gusts and protects board toes from splashback.
- A top cap shades the end grain and stiffens the top edge, reducing chatter.
- Hidden control joints (discreet breaks in long runs) prevent one long span from acting as a single sail.
- Where the yard falls off, rock curbs close daylight under panels at low spots without damming water.
- The vertical rhythm remains consistent—even with joints—so the eye reads a calm, continuous line.
The homeowner maintained privacy in the areas where they lounge and cook; toward the back corner (where the wind piled), we used a slightly more open assembly that preserved sightlines while reducing lift.
Gate Bay: Where Storm Damage Shows First
A fence is only as reliable as its busiest leaf.
- Rigid steel frame for the gate leaf so it doesn’t twist and sag during wet/dry cycles.
- Adjustable heavy hinges, barrels in line, with stainless or exterior-rated hardware.
- Bottom clearance near ~1″ over a broomed-concrete pad that pitches water away from the hinge side.
- Place the latch out of the hottest late-day sun; wide grips stay cooler and are easier for kids to use.
- On tight sites or wind channels, cantilever sliders keep the swing arc out of the storm path; here, clearance allowed a swing leaf with tuned hardware.
The old gate dragged mud; the new threshold drains, and the leaf stays square.
Drainage & Erosion Controls That Quiet the Line
Think in paths, not puddles.
- A shallow swale on the uphill side catches sheet flow before it hammers posts.
- Downspout extensions, hardscape, and land past the fence toe; splash blocks alone weren’t cutting it.
- Along the messiest stretch, a DG mow strip creates a tidy, fast-drying toe and keeps string trimmers off boards.
- Two rock check dams in the swale slow velocity during fast bursts.
- At low saddles, rock curbs hold the line tight without creating a dam—key for keeping water moving off-site.
After the next two rains, the homeowner reported dry toes, no fresh lean, and a gate that still latched with two fingers.
Materials, Finishes, and Heat-Smart Details
Storm-quiet doesn’t have to look tactical. It can feel calm and clean:
- 4×6 posts at corners and gate bays for stiffness; 2× pickets set straight from a taut line for visual serenity.
- Hot-dip galvanized or coated fasteners throughout; through-bolts are used where possible.
- Semi-transparent, mid-light neutral stain that runs cooler and hides hard-water spotting better than espresso tones.
- Fine-texture matte hardware so fingerprints and dust don’t jump out in afternoon glare.
- For metal accents, matte finishes read cooler and avoid “hand-sizzle” in August.
The finish is scheduled for a fall or mild spring window, allowing the coat to cure evenly without baking.
Neighbor, HOA, and Insurance Coordination
Storm work touches more than lumber:
- Neighbor lines: For shared runs, we documented where we’d stop/start and who would stain.
- HOA: Neutral stains and flat-top profiles tend to gain approval quickly; we provided a simple spec sheet and color chip.
- Insurance: We photographed the pre-demo conditions, footing details, and the water path—insurers prefer root-cause evidence over replacement receipts.
Clear paperwork meant no surprises when checks arrived.
Timeline & Crew Flow (What Happens Each Day)
Day 1: Triage, safety braces, temporary panels; layout strings; probe holes for rock; mark swale and DG toe band.
Day 2: Drainage work first—swale and downspouts—so new holes don’t flood; selective demo of failed sections.
Day 3: Set posts with gravel beds and crowned collars; core-drill where limestone is visible; pour a small gate pad.
Day 4: Hang panels, install control joints, set rock curbs at low daylights; uniform base gap check.
Day 5: Gate build: frame, hinges, latch tuning; punch-list plumb/plane tweaks.
Day 6 (weather window): Stain application; mask hardscape and plantings; walkthrough and care sheet.
Because drainage occurred upfront, holes remained clean, and the line stayed true while the collars cured.
Results & Homeowner Notes
Immediately better:
- The yard felt quieter in the wind; panels no longer chattered, and the gate didn’t rattle.
- After a hard rain, no puddles at posts and no mud line against boards.
- The street-side look remained consistent; there was no patchwork feel, even with surgical replacements.
A month later:
- No fresh lean, even after two thunderstorm days.
- Gate still latched with two fingers; hinge barrels remained aligned.
- The DG tool made mowing and cleanup faster, with less debris stacking against the fence.
Maintenance Road Map (What to Check and When)
Storm-smart fences still appreciate quick eyes:
- After big fronts: Walk the corners and gate bay; tighten hinge hardware if needed; rake the DG back into place where the flow pushed it.
- Quarterly: Confirm 2–3″ base gap and blow out leaves at the toe.
- Each spring: Verify downspout extensions still reach past the fence toe; re-cut the swale if sediment has built up.
- Every 2–3 years: Refresh stain on west-sun runs when water stops beading.
- If multiple posts move together: Schedule targeted repairs before racking spreads to panels.
For broader preparedness tips, the Storm Fence Checklist for Austin is a helpful seasonal read.