
TL;DR
A retaining wall with a fence on or near it is not a “stacked” project—it’s one structural system that must handle soil pressure, wind, drainage, and movement together. In Austin, that means: verifying setbacks/easements, choosing the right wall type (block, cast-in-place, drilled pier/grade beam, timber tie-back), engineering load paths for both lateral soil and fence wind loads, detailing drainage (weep, free-draining backfill, fabric, pipe), and getting post anchoring right (behind the wall, atop the wall with proper anchors, or offset with independent footings). Finish it with caps, flashing, and gap details that shed water, and you’ll keep lines straight—no bulges, no leaning panels—through Austin’s clay swells, limestone shelves, and thunderstorm downpours, ultimately ensuring a successful retaining wall fence design. For planning, design/build, and permitting in Central Texas, start with Atlas Fence Company so your fence and wall act like one calm, code-compliant system.
Why walls and fences fail when treated separately
A retaining wall’s job is to resist lateral earth pressure and move water away. A fence’s job is to take wind load and transfer it into posts and footings. When you stack them without coordination—say, bolting a heavy privacy fence onto a thin cap, or burying posts in backfill—the loads add up in the worst spot. The outcome is predictable: bulging block courses, leaning panels, and cracked caps where trapped water freezes/expands (or, here in Austin, where clay swells and shrinks seasonally), affecting the overall durability of the structure.
The fix is simple in concept: decide where each force goes, then give it a clean path to ground—before you set your first block or dig your first post hole during the installation process.
Austin soils 101 for wall + fence design

- Expansive clays (South/East Austin, Round Rock/Pflugerville pockets): Clay swells when wet, shrinks when dry—pushing walls out and loosening fence sockets if collars trap water. Use free-draining backfill, geogrids at specified lifts, and set fence posts on gravel beds with crowned collars so sockets dry quickly.
- Shallow limestone (West/NW Austin, Westlake, Bee Cave): Augers stall in shallow conditions; walls often require core-drilled piers or drilled shafts below a grade beam. Fence posts should core-drill 8–12″ into competent limestone rather than stopping short.
- Mixed lots: One run may dig like butter, and the subsequent hits rubble—write specs that adapt hole-by-hole (embedment depths, core-drill policy), not a one-depth-fits-all note.
Code & permitting: heights, setbacks, and who signs off
- Combined height matters. A 3–4′ wall with a 6–8′ fence above isn’t “just a fence.” Jurisdictions often measure overall barrier height from the low side. Expect different thresholds for engineered drawings.
- Setbacks & easements. Don’t build a wall into a public utility easement or the sight triangle at a corner lot. Yard-side privacy needs can conflict with line-of-sight safety.
- HOA approvals. Many HOAs prefer open profiles along greenbelts, even if the wall is solid. Plan privacy pockets inside your yard if the rear must remain see-through.
- Engineering stamps. For tall walls, tiered walls, or any fence anchored to a wall, plan for a licensed engineer to review design loads, geogrid lengths, cap connections, and any post-in-wall anchoring.
- Inspections. Expect checkpoints at footing/piers, block to geogrid tie-ins, and the final stage.
Load paths you must respect (soil vs. wind)
Think in arrows:
- Soil pressure pushes the wall outward (low to high). Your wall resists with mass, geogrid reinforcement, batter (lean back), and a drained backfill zone.
- Wind pushes the fence sideways. Your fence resists with posts, embedment (or steel posts), and frames/rails that tie into those posts.
- Where they meet: If you mount the fence on top of the wall, the moment the wind tries to pry the cap/face. If you set the fence behind the wall in natural grade, its loads bypass the wall.
The design exercise involves choosing the desired load path and then building details that deliver it effectively.
Three placement strategies for fences at walls
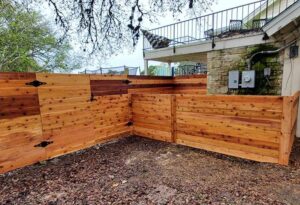
1) Fence set behind the wall (recommended for many yards)
- Posts sit in native grade behind the wall’s backfill.
- Loads travel to the post footings, not the wall.
- Requires space for the drainage zone and geogrid; mind root zones/landscaping.
- Detail a clean gap between the top of the wall and the first fence board so water sheds and debris don’t bridge.
2) Fence mounted on top of the wall (only with proper anchors and calcs)
- Use cast-in sleeves, through-bolted plates into a reinforced bond beam, or core-drilled posts grouted into the wall—never tapcons into caps.
- Engineer for overturning: calculate wind pressure, post spacing, and anchor capacities; add a continuous bond beam or embedded steel where needed.
- Great for areas where rear yards are tight, but it costs more and always requires careful specs.
3) Fence offset from the wall on an independent grade beam
- A narrow drilled-pier/grade beam right behind the wall carries fence loads independently.
- Ideal where backfill is shallow or geogrid lengths don’t allow standard post holes.
Drainage details that prevent bulge, heave, and rot.
Retaining walls fail less from “not enough block” and more from trapped water, which must be appropriately managed to secure the integrity of the wall.
- Free-draining backfill: ¾” clean rock or specified granular fill from base to near top; keep fines out.
- Filter fabric: wrap the soil/rock interface so clay can’t migrate into the drain zone.
- Perforated drain pipe with positive daylight or tied to a drainage system; inspect outlets and keep them clear of mulch.
- Weeps: clear, consistent weep locations near base—don’t block them with landscape borders.
- Surface water control measures include swales and downspout extensions, preventing roof runoff from loading the wall backfill.
- Fence toe health: at the fence line (wall-top or behind), maintain a 2–3″ base gap and add a 6–12″ decomposed-granite (DG) toe band so splash dries quickly and mud doesn’t wick into boards.
For a deeper refresher on keeping fence lines dry (with or without walls), pair this guide with Erosion & Drainage Around Fences in Austin—the same principles protect wall-adjacent panels.
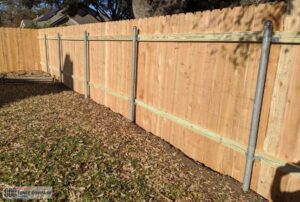
Post anchoring: cores, sleeves, plates, and offsets
Choose the proper anchor method for your wall type and load:
- Core-drilled posts (in wall or rock): Drill oversize, set with non-shrink grout, and sleeve/flash at the cap. Best for cast-in-place or solid-core block with a bond beam.
- Cast-in sleeves: PVC or steel sleeves set during pour/block placement; posts drop in later with grout. Clean, serviceable, and aligned to rails.
- Base plates with through-bolts: Only into reinforced bond beams with designed anchorage; don’t rely on surface glue or short anchors into the cap alone.
- Independent footings behind the wall: Standard post holes or drilled piers that don’t disturb geogrids. Keep a minimum offset so excavation doesn’t undermine the wall; on grid walls, coordinate exact no-dig zones.
Embedment targets (behind-wall posts):
- 6′ fence: 30–36″ embedment in clay; core-drill 8–12″ into limestone.
- 7–8′ fence: 36–42″ in clay (larger diameters at corners and gate bays).
- Finish with crowned collars 1–2″ above grade so sockets dry fast.
Cap stones, flashings, and base gaps that shed water
- Cap stones on block: pitch a subtle slope away from the fence. Use a cap adhesive rated for exterior movement, and don’t trap water beneath pickets.
- Metal coping/flashings on cast-in-place: hem edges, turn up under fence plinths, and seal penetrations around posts.
- Base gaps: maintain 2–3″ between the bottom board and cap to break capillary wicking and to let wind bleed.
- Seal the end grain of any board that sits near wall surfaces; end grain is a source for moisture.
- DG toe band along fence lines adjacent to walls keeps the cleanup simple and the toes dry.
Gates at grade changes: thresholds, stairs, and latch heights
- Threshold pads: pour a small broomed-concrete pad at gate bays, pitched away from hinges; maintain ~1″ leaf clearance so mud never drags.
- Stair treads beside walls: use slip-resistant finishes and leave weeps open.
- Latch height: where pool or drop conditions exist, set latches to 54″ minimum and consider self-closing hinges.
- Hinge geometry: align barrels and use adjustable heavy-duty hinges on a rigid steel gate frame; through-bolt hardware.
Greenbelt edges, corner lots, and neighbor lines
- Greenbelts: HOAs may require open metal on the rear; create privacy pockets inside your yard with a short board-on-board wing perpendicular to the rear line.
- Corner lots: preserve visibility triangles; step down fence height or switch to open profiles near the triangle.
- Shared property lines: coordinate wall ownership, drainage responsibilities, and fence face side in writing before mobilization.
Build sequence & timeline (what happens each day)
Pre-construction (3–10 days)
- Site walk, soils probing, utility/irrigation mapping, preliminary engineering review, and HOA/permit packet.
- Staging pad chosen; access path protected.
Day 1–2: Wall foundations & first lifts
- Excavate/auger footings or piers; place drainage pipe and first lift of free-draining backfill; set first block or pour stem.
- If you are using sleeves for posts, set the templates now.
Day 3–4: Wall to design height & drainage finish
- Tie the geogrids at design intervals; maintain compaction; verify drain pipe slope; leave clean weeps/daylight.
- Cap stones or coping per spec (or delay caps until fence anchor penetrations are sealed).
Day 4–5: Fence structure
- If behind-wall: dig posts to target embedment; place 6–8″ compacted clean rock; pour from bottom up; finish crowned collars.
- If on-wall: core-drill/set posts or set base plates into the bond beam with specified anchors; grout and flash penetrations.
Day 5–6: Panels, rails, gates
- Maintain 2–3″ base gap; use top caps to stiffen panels; break long runs with control joints.
- For metal infill, match powder-coat to coping/cap; for wood, pre-seal end grain.
Finish window
- Stain wood in fall or mild spring; keep irrigation off faces for 48–72 hours.
- Final cleanup: confirm weeps/daylight aren’t blocked by DG or mulch.
Quality checks before you cut the final check
- Wall plumb/batter matches plans; no early bulges.
- Geogrid lengths and lifts have been documented; the backfill is free of fines at the wall.
- Drain daylights/weeps are visible and apparent.
- Fence post embedment verified; crowned collars on every hole.
- Base gap consistent; DG toe band installed where specified.
- Gates clear threshold pads and latch with two fingers.
- Penetrations at caps/coping sealed and flashed; no ponding at fence interfaces.