
TL;DR
Shared-line fences go smoothly when you do three things up front: align expectations, write the scope, and decide how money moves, staying mindful of proper fence etiquette . In Austin, that means one courteous kickoff message with a sketch and dates, a written spec that treats the fence like infrastructure (post embedment, gravel beds, crowned collars, 2–3″ base gap, gate geometry), and a signed paper trail covering style/height, cost split, and warranty holder(s). Keep approvals (HOA/City) and property-line confirmations in the same file as bids and receipts. If relations are tense, use neutral language and choose a style that’s easy to maintain on both sides. When you’re ready for pro help, start by looping in the local team at Atlas Fence Company so everyone sees the exact numbers, drawings, and timeline from day one.
Why neighbor projects succeed (it’s not luck)
Great neighbor projects are built on predictability. People get anxious when they don’t know what the project will look like, the cost, or when crews will arrive. So we make it boringly clear: a one-page sketch, a bulletproof scope, and a calendar. We also design the fence to survive Austin soils and storms, because nothing strains neighbor relations like poorly planned neighbor friendly fences. like a pretty fence that leans by next summer.
Step-one etiquette: the message, the sketch, and the tone
Lead with clarity and respect. A quick text or email does wonders:
- Friendly intro: “We’re planning to refresh the fence on our shared line so it’s safe and straight again.”
- Sketch & photos: attach a phone sketch with gate locations, heights, and lengths.
- Why now: safety, pets, storms, or rot—keep it factual, not accusatory.
- Invite input: colors, cap/trim, or privacy needs around patios.
- Please note that you’ll receive a scoped bid with detailed structural information, not just visual designs.
If they’re cautious, keep early choices reversible: e.g., neutral stain, top cap/no cap both look clean, and hardware in matte finishes that run cooler in Austin sun.
Scope that protects both neighbors (structure before looks)
A shared fence must age calmly. That’s a spec issue more than a style issue.
Posts & embedment
- ≤6′ fences: 30–36″ embedment in clay.
- 7–8′ fences: 36–42″ in clay.
- Hit limestone shallow? Core-drill 8–12″ into competent rock and grout—don’t cut posts short.
Footings
- 6–8″ compacted clean ¾” rock at the bottom of every hole (use a geotextile burrito in fat clays).
- Pour from the bottom up; rod lightly; finish a crowned collar 1–2″ above grade, sloped away from wood/steel. Never flat.
Ground-line hygiene
- Keep a 2–3″ base gap to stop splash wicking and to let wind bleed.
- Add a 6–12″ decomposed-granite (DG) toe band along muddy stretches.
- Extend downspouts so water lands past the fence toe; cut a shallow upslope swale so sheet flow runs parallel to the line.
Long-run wind behavior
- Break billboard spans with hidden control joints every 24–32′.
- Consider a top cap to stiffen and shade the end grain, which also unifies the look.
Gates
- Use a rigid steel frame with adjustable heavy-duty hinges (barrels on one axis), a small broomed, pitched pad, and ~1″ clearance under the leaf so mud never drags.
- Through-bolt hardware; lags loosen in moving soils.
Put these bullets in writing on the quote. It protects both neighbors and the installer, demonstrating common courtesy .
For new builds where everything changes at once (layout, hardware, heights), fold this scope into a cohesive fence installation plan so the bones match the look from day one.
Picking style, height, and finishes you’ll both live with
Style:
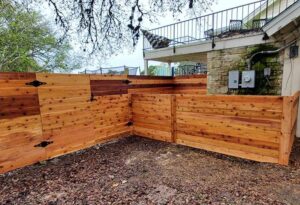
- Side-by-side is budget-friendly; board-on-board delivers true blackout privacy; shadowbox improves airflow along greenbelts.
- On shared lines, pick a profile that looks finished on both sides, or agree which side gets the “face” and make it explicit.
Height:
- Commonly 6′; some corners/arterials want 7–8′ (check rules and visibility triangles).
- Step for slope; avoid awkward racking of horizontals on strong grades.
Finish:
- Use penetrating stains; mid-light neutrals run cooler in Austin heat and hide dust and sprinkler spotting.
- Schedule in fall or mild spring; keep irrigation off faces for 48–72 hours.
- Agree on who maintains finish cycles (e.g., “we alternate every 2–3 years”).
If you’re reconciling tastes, bring two neutral plots and a single premium upgrade (e.g., add a top cap). People choose faster from three.
Cost split models that feel fair (and how to document them)
There’s no universal law for splits among private neighbors. Pick something that fits the benefit and budget reality:
50/50 on the shared stretch
- Cleanest when both benefit evenly.
- Each pays 100% for non-shared upgrades (personal gates, returns, pet screens).
Proportional upgrade
Base build is 50/50; the neighbor’s request for a premium (board-on-board, taller sections, cap/trim) covers the delta cost of that upgrade.
In-kind exchange
One pays more now; the other covers a planned project later (e.g., stain cycles). Put values in writing so they don’t become unclear.
Payment logistics
- One contract, two payers, or two separate invoices that together equal the total.
- Agree on who holds the warranty (usually the contract holder) and how service calls are requested.
Put it in writing
- A one-page memo: length(s), height, style, hardware, post/footing spec, cost, split, stain timing, warranty contact, and signatures (typed names and dates are fine).
- Keep the memo with the quote, receipts, approvals, and photos.
Property lines, easements, and visibility triangles
- Property line: pull the last survey or use existing pins; string the line for the walkthrough. Don’t assume the old fence is correct.
- Easements, such as utilities and drainage swales, can limit style and location.
- Corner lots: visibility triangles near alleys/intersections can require open profiles or height steps near the corner.
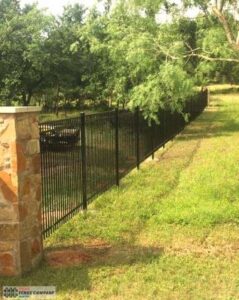
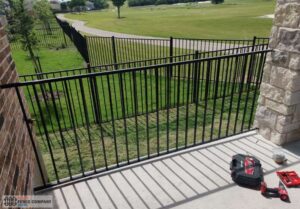
When easements, greenbelts, or drainage are involved, the “rear” may need open metal to respect property boundaries , and privacy must come from interior pocket screens. If this sounds like your yard, skim our calm primer on neighbor dynamics and rules here: Fence Neighbor Disputes in Austin (What to Know Before You Build).
HOA and City items to gather once, not three times
- Style sheet & color notes from HOA.
- Height/opacity rules along streets or greenbelts.
- Visibility triangle diagram for corners.
- Any permit triggers (often based on overall height or location).
- Neighbor notice requirements, if your HOA has them.
Bundle these PDFs with the quote to avoid any confusion.
Gate situations: shared access, pet safety, and hardware choices
If there’s a gate between yards:
- Decide whether it stays, moves, or goes away.
- Set the latch height and which side controls the latch.
- Use a two-point latch for broad leaves and a drop rod if wind channels through.
- Pour a small pitched pad; keep ~1″ clearance under the leaf.
If gates are separate but adjacent, stagger their latch locations to prevent collision during daily use.
Timeline everyone can plan around
Pre-build (3–10 days)
- Joint walk, string line, soil probe, neighbors pick the same spec sheet, submit HOA/City packet, select stain color.
- Pick a single crew gate for access; mark irrigation and drainage.
Day 1 — Layout & selective demo
Remove only what must go to keep both yards secure overnight; temporary panels where needed.
Day 2 — Footings
- Dig to embedment targets; core-drill in limestone; place 6–8″ compacted clean rock; pour from the bottom up; finish crowned collars on every post.
- Photo log of depths and collars for your file.
Day 3 — Panels
Hang panels with 2–3″ base gap; add top caps; break long runs with control joints.
Day 4 — Gates & hardware
- Rigid frames; adjustable hinges; threshold pads; latch test (“two-finger close”).
- Cleanup; schedule stain window.
Finish window
Stain in fall/mild spring; keep irrigation off faces for 48–72 hours.
Paper trail: what goes in the folder (with a sample checklist)
Keep a single shared folder (cloud or email thread) with:
- Sketch
- with lengths, heights, gates, and step areas.
- Spec sheet: posts, embedment, gravel beds, crowned collars, base gap, top cap, control joints, gate hardware, threshold pad, stain color.
- Quote and change log (if any).
- Split memo with signatures.
- HOA/City approvals or “no permit required” note.
- Before/after photos, footing photos, and final invoice.
- Warranty and How to Request Service (One Named Contact)
This paper trail prevents 90% of future “who said what” moments.
What to do when you disagree (calm paths before conflict)

- Default to neutral: mid-light stain, standard height, top cap optional, clean trim.
- Compromise on location: prioritize privacy where it matters (the patio side) and remain neutral elsewhere.
- Split deltas: if one wants a premium, they pay the difference over the base—documented.
- Use a pro scope: it’s easier to agree on a real drawing than a text thread.
- Stay factual: reference safety (lean, rot, storm lean), not taste, when explaining urgency.
If the relationship is truly strained, keep communications in writing and reference objective facts (photos, measurements, approvals). We maintain a calm tone and turnkey scope in our neighbor-facing bids as part of fence repair services, so you’re not the go-between.