
A smooth fence project in Austin flows through predictable stages: discovery → estimate → site walk & design → HOA/permits → utilities & pre-install prep → post setting → panels & gates → finish/stain → punch list & final walkthrough. Budget 2–7 business days for estimating and approvals, 1–3 weeks for material scheduling and HOA/permit timing, and 2–5 workdays on site, depending on length, terrain, and staining. The quiet hero is ground-line planning: crowned collars, gravel beds, base gaps, swales, and DG toe bands that keep posts plumb through our expansive clays, shallow limestone, and August cloudbursts.
Why Austin timelines look different

Austin projects run on Texas weather, geology, and city/HOA rules—plus the realities of busy crews after spring storms. The thing that bends most schedules here isn’t lumber delivery; it’s soil and water. Expansive clays swell after rain and shrink in the summer heat; northwest neighborhoods encounter limestone shelves at depths of 12–20 inches. A build plan that respects those conditions (and writes them into your scope) helps to avoid delays and avoids the two most considerable delays: re-digging failed holes and return trips to re-square gates.
With Atlas Fence Company engaged early for professional installation , you can map soil hits, drainage paths, and access routes before a single post is set—so the schedule you see is the schedule you get.
The complete fence project timeline (from first call to final walkthrough)
Discovery & estimate request (Day 0–2)
You share photos, linear footage, height targets, fence type style preferences, and any known pain points (such as lean, soggy corners, or gate problems). A quick phone map of yard access (gate width, slopes, trees) and site constraints sets expectations for crew flow and staging.
Deliverables you should receive: a scope outline with fence materials, height, gate count, and a note that post footings include gravel beds and crowned collars—the details that keep your line straight here.
On-site estimate & design consult (Day 2–7)
The walk reveals soil type (probe holes), rock shelf hits, drainage paths, and utility/irrigation risks. You’ll finalize height, style, and gate swings/latch heights, and decide where to break long runs with control joints (wind relief).
For homeowners who want deeper planning—especially after storm damage or on greenbelt edges—consider integrating the consultation into a complete fence installation in Austin, so that footing geometry, drainage, and staging are optimized from the start.
Proposal, revisions, and approval (Day 3–10)
Expect a fixed scope, clear allowances (including rock coring and debris haul-off), and a schedule window that accounts for weather conditions and HOA/permit requirements. Disapprove until the proposal explicitly lists embedment depths, core-drill policy at shallow rock, gravel beds, crowned collars, and base gaps—those are schedule-savers later.
HOA & permit track (parallel, 3–14 days typical)
Many Austin HOAs require submittals for height, style, and color; the City may also require a fence permit for certain heights or locations. Submit early. Keep PDFs of approvals in the job folder—you’ll want them for resale and warranty transfers.
Material scheduling & staging plan (parallel, 3–10 days)
Crews block a date once approvals land and materials are confirmed. You’ll pick a staging pad and a 36″+ access path; heavy items should be placed as close as practical to the dig zones to preserve lawns and reduce carry time.
Pre-construction essentials: surveys, HOA, permits, and neighbors
Survey/lines:
- Confirm pins or string lines; measure from the fixed hardscape if pins are hidden.
- Decide which side sees the “good face” and where returns happen at corners.
HOA/permit packet:
- Height, style, and any color selections; include site plan.
- Save the approval and receipts in one PDF—it speeds closings and warranty transfers.
Neighbors:
Share the schedule and access routes. For shared lines, agree on stain color/maintenance and gate decisions now, in writing.
Pro move: attach a one-page “line & finish” sketch to your proposal so we’re all building the same project.
Utilities and irrigation: safety and scheduling
Two scheduling killers: cutting irrigation and unexpected utility bills.
- Public locates for gas/electric/communications if driving posts or digging near easements.
- Flag and cap private irrigation (spray heads, drip laterals, control wires).
- Mark French drain routes so corers don’t collapse them.
- Please take photos of flags before mowing or storms, and move them accordingly.
Safety callout: Keep pets inside during augering and coring; crews cannot reliably watch gates while operating equipment.
If you’re still dialing access, staging, and pet plans, this pairs well with a homeowner prep list—use the step-by-step checks in the fence install checklist for Austin to keep the week calm and on time.
Build week: what happens each day and how long it takes
Day 1 — Layout, probing, and selective demo
- Confirm lines, heights, gate locations, and any step transitions.
- Probe for limestone; where shallow, switch to core-drill plan.
- Demo only what must move now; keep secure areas intact until replacement is ready.
Time saver: Set strings at the ground line and top line so posts read plumb and in plane, even on slopes.
Day 2 — Footings (the most important day)
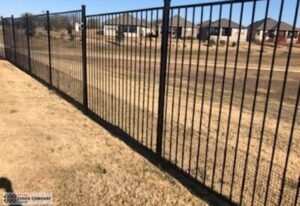
- Dig to embedment target: 30–36″ for ≤6′ fences in clay; 36–42″ for 7–8′ fences; core-drill 8–12″ into rock where limestone is shallow.
- Place 6–8″ compacted clean ¾” gravel in each hole (geotextile burrito in fat clays).
- Pour concrete bottom-up and finish crowned collars 1–2″ above grade—never flat bathtubs.
- Brace posts plumb on two faces and sight every third post down the run.
Weather note: If the clay is saturated, crews may resequence runs to higher ground and return as the holes drain. Expect honest timing calls—rushing bad holes is how schedules truly slip.
Day 3 — Panels, rails, and control joints
- Hang panels with a consistent 2–3″ base gap to stop splashback.
- Add top caps to shade end grain and stiffen long spans.
- Break very long runs with hidden control joints so wind doesn’t turn a panel into a sail.
- Close low daylight with rock curbs where slopes dip—but leave weeps for water.
Day 4 — Gates, hardware, and threshold pads
- Build gate leaves on rigid frames with adjustable hinges, aligning the hinge barrels.
- Set ~1″ clearance over a small broomed-concrete pad pitched away from hinges.
- Move the latch/handle out of the hottest sun where possible for comfort and a longer life.
- Test swing both ways; tune latches for a two-finger close.
For long or complex runs, panels and gates can extend into Day 5. If staining is part of the scope, that’s either Day 5–6 or a separate weather window (see next section).
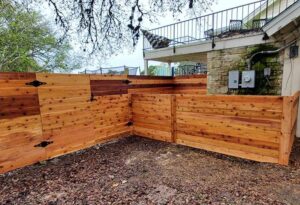
Staining & finishing windows: picking your weather
Wood needs a mild, dry window to accept stain evenly. Austin’s best windows are fall and mild spring.
- Penetrating stains breathe and are easier to maintain; plan a 2–3 year refresh on west-sun runs.
- Keep irrigation off faces for 48–72 hours after staining.
- If your project includes finishing, align it as a separate mobilization or tack it on to a calm day after the gates are hung.
Prefer to outsource coating entirely? Book it through fence staining in Austin so product family, weather, and cure time are coordinated with your build crew.
Quality control checkpoints you should insist on
- Footings: each post set on gravel beds with crowned collars; no wood encased below grade in flat concrete.
- Depth notes: crew lead records embedment and core-drill locations—great for future service.
- Line & plane: sight down strings; correct before concrete sets.
- Base gap: verify 2–3″ clearance and clean toes for a DG band if specified.
- Gates: check swing and latch after a hose test on the threshold pad.
Safety callout: Do not lean ladders against flexible privacy panels during punch-list touch-ups—brace them against posts or rails.
Payment stages, warranties, and documentation
A clear payment plan tracks progress milestones: a deposit at proposal sign-off, a footing day installment, and the balance at final walkthrough. Ask for:
- Workmanship warranty terms in writing, including response time for punch items and whether labor is included for warrantable fixes during the term.
- Material registrations (composites/metals) with labels/QRs stored in a shared folder.
- A simple care guide: irrigation settings near the fence, stain timing, and a drainage sketch.
Save PDFs of the proposal, approvals, registrations, and line photos of crowned collars/base gaps. That packet speeds resale, transfers, and any future claims.