
TL;DR
Twice-a-year fence inspections prevent minor issues—such as poor drainage, loose hardware, and finish wear—from developing into major problems, including leaning runs, stuck gates, and premature replacements. Use this fence inspection checklist austin to walk your perimeter in 20–40 minutes, prioritize fixes, and plan a simple upkeep rhythm that fits our heat, UV, clay soils, limestone shelves, and storm bursts.
Why an annual check matters in Austin
With Atlas Fence Company as your fence company reference point, the objective is simple: spot early signs of movement and moisture before summer heat or a fall storm exaggerates them. Central Texas fences fail for predictable reasons—expansive clays swell and shrink, thin soils over limestone limit post depth, and UV + wind punish long privacy runs. A focused inspection twice a year (spring and fall) adds years to the life of wood, metal, and composite systems—while keeping gates easy and safe to use.
What you’ll need (simple tools & safety)

- Gloves and eye protection (splinters happen)
- Tape measure (check base gaps and clearances)
- 2–4 ft level or a plumb app (quick lean checks)
- Rubber mallet or small hammer (tap-test posts)
- Nut driver/socket set + bits (tighten hinge/bolt hardware)
- Garden trowel (clear debris at collars)
- Leaf blower or stiff brush (clean fence toe)
- Phone camera (document before/after; track trouble spots)
Optional: hose for a 2–3 minute flow test at chronic puddle areas and a metal detector if you want to re-find old survey pins while you’re out there.
10-minute “Quick Pass” (whole perimeter)
Walk the entire fence line once, fast:
- Lean & plane: Sight down each run—are tops wavering or posts out of plumb?
- Ground line: Are the bottom boards buried, collars flat, or mulch piled against wood?
- Gates: Any leaf dragging, hard latching, or latch/lift gymnastics?
- Finish wear: Gray, thirsty boards on west exposures; chalking or flaking on painted areas.
- Hardware: Rust blooms, missing caps, or loose through-bolts.
Flag sections for a deeper look. If something is unsafe (such as a collapsing panel or broken pickets near a pool), mark it for same-day attention.
Deep Dive—Step-by-step inspection
1) Drainage & grade along the fence toe
Why it matters: Most problems start at the ground line. Water that pools, splashes, or wicks into wood can cause posts to move, boards to rot, gates to jam, and lead to costly repairs.
Checks
- Base gap: Maintain 2–3 inches between soil and bottom board/rot board. Note any areas where soil or mulch comes into contact with wood.
- Collars: Concrete around posts should be crowned, not flat. Flat “bathtubs” hold water against wood/steel.
- Flow paths: Look for rills, exposed roots, or sediment lines—clues that sheet flow favors the fence toe.
- Downspouts: Are any discharging within 6–10 ft of the line? Note them.
What “good” looks like: A clean DG (decomposed granite) or paver band 6–12″ out from the fence, collars shaped like mini volcanoes, and daylight under boards.
Fix ideas
- Rake back soil/mulch to re-establish the gap.
- Bevel or resurface flat collar tops to prevent water from accumulating.
- Add a subtle swale upslope or downspout extension to push water past the line.
- Install a DG toe band to keep the area dry and tidy.
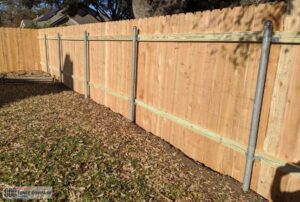
2) Posts & footings (wood and steel)
Why it matters: If posts move, everything moves, impacting the fence’s structural integrity.
Checks
- Tap test: Knock at ground line—spongy feel = decay or loose set.
- Plumb: Check a few representative posts per run with a level.
- Depth clues: In west/northwest neighborhoods, you may encounter rock shallow; watch for short embedment signs (indicating easy rocking).
- Steel posts: Look for rust at collars or where fasteners meet different metals.
What “good” looks like: Posts feel anchored, collars are proud and crowned, and there is no dark/stained wood at the soil interface.
Fix ideas
- For a single wobbler, excavate around the collar, add a gravel bed under the post if missing, and re-pour a crowned collar.
- Where rock is shallow, core-drill 8–12″ into limestone and set with non-shrink grout for long-term plumb.
- If several in a row are loose or decayed, plan targeted replacements rather than chasing panel repairs.
3) Panels, rails, and pickets
Why it matters: Panels telegraph movement and catch the wind.
Checks
- Cracked or cupped pickets—especially on west runs.
- Loose rails or rail fasteners backing out.
- Top edges: End-grain checking accelerates without shade; top caps help.
- Uniform base gap: Low spots invite erosion and animal traffic.
What “good” looks like: Tight fasteners, calm vertical rhythm, even base gap, and characteristics of a well-maintained fence, with no chronic wet lines on boards.
Fix ideas
- Replace a few bad pickets; add a top cap to shade the end grain.
- At dips, add rock curbs or skirt mesh to close daylight without damming water.
4) Gates, hinges, latches, and thresholds
Why it matters: Gates are used daily and fail first.
Checks
- Swing test: The leaf should travel freely without scraping against the surface.
- Hinge alignment: Hinge barrels should be in a straight line; misalignment causes bind and sag.
- Clearance: Aim for ~1 inch over a firm threshold (DG or broomed concrete).
- Latch feel: Two-finger operation, no shoulder checks.
What “good” looks like: Rigid frame, adjustable hinges snug, and for wood fences, latch lines up every time—even after a storm.
Fix ideas
- Tighten through-bolts; shim hinges to re-square the leaf.
- Pour a small threshold pad pitched away from the hinges.
- If the leaf is twisting seasonally, consider retrofitting with a rigid steel frame.
5) Hardware & fasteners
Why it matters: Rust creeps under finishes and loosens structure.
Checks
- Exterior-rated coated or hot-dip galvanized hardware throughout.
- Look for mixed metals (galv + bare steel + copper).
- Missing caps or washers that let water into bolt holes.
Fix ideas
- Replace with like-kind exterior hardware; avoid mixing metals that accelerate corrosion.
- Seal large penetrations; keep water out of end grain.
6) Finishes (wood stain/paint)
Why it matters: Finish protects against UV, heat, and moisture.
Checks
- Bead test: Sprinkle water—if it doesn’t bead, the wood is thirsty.
- Color fade / gray: Heaviest on west-sun sections.
- Algae/mildew: Often from irrigation drift or bottom boards sitting in damp mulch.
What “good” looks like: Even color, beading water, no dark wet zones near soil.
Fix ideas
- Plan a full re-stain when broad areas stop beading; spot-treat small sections only if the rest of the area is healthy.
- Align work with mild weather. Prefer penetrating stains; avoid trapping moisture under films.
- If you’d rather outsource, book professional fence staining on a 2–3 year rhythm for sun-blasted runs.
7) Metal, composite, and chain link notes
Metal
- Wipe chalking; touch up chips quickly to stop under-film rust.
- Fine-texture matte finishes hide dust and stay cooler to the touch.
Composite/PVC
- Check for warping near hot hardscape; clean with mild soap, not harsh solvents.
- Hard water spotting appears on dark colors—aim sprinkler heads away from them.
Chain link
- Confirm fabric tension, ensure bottom ties are intact, and verify post plumb.
- Look for corrosion at hardware and at collars.
8) Vegetation, irrigation, and soil contact
Vegetation
- Keep shrubs 6–12 inches away from faces for optimal airflow.
- Trim vines; they trap moisture and create a sail-like effect in the wind.
Irrigation
- Redirect the spray away from the wood and convert it to a drip near the fence toes.
- Stop watering “against” a fence to keep the finish and hardware healthier.
Soil contact
No mulch or soil piled against boards. If you see it, rake back and re-establish the base gap.
Scoring what you find (decision tree: watch/DIY/pro)
- Watch (note & revisit in 3 months): Minor fade, a couple of hairline checks, one low daylight spot with no erosion.
- DIY this weekend: Rake back mulch, cut a tiny swale, bevel a flat collar, add DG toe, tighten hinge bolts, replace a few pickets.
- Call a pro: Multiple wobbly posts in a row; shallow rock forcing short holes; gate leaf twisted beyond hinge adjustment; widespread finish failure you don’t want to tackle. For structural fixes and proper resets, schedule targeted fence repairs so you stop chasing symptoms.
After-storm micro-inspection (what to check first)
Within a day or two of a big front:
- Corners and gate bays—these collect the worst loads.
- Swales and downspouts—clear sediment; confirm extensions still reach past the line.
- DG toe band—rake back into place where the flow pushed it.
- Hinge barrels—verify alignment; re-snug bolts.
- Ponding prints—dried mud at collars signals where to add crown or relief.
Two minutes with a rake and a socket can often prevent weeks of slow leaning.
Minor fixes that make a big difference
- Crown the collar at every post you touch. Water should never sit flat where wood meets concrete.
- DG toe band (6–12″) keeps mud off wood and speeds drying after storms.
- Top caps on long privacy runs reduce end-grain checking and quiet the line in the wind.
- Rock curbs at dips close daylight under panels without damming flow.
- Downspout extensions—cheap, fast, game-changing for soggy corners.
Seasonal maintenance rhythm that actually sticks

- Early spring (Mar–Apr): Conduct a full inspection, rake back mulch, set the DG toe, tighten hardware, and schedule staining if the water fails the bead test.
- Early summer (May–Jun): Check irrigation drift, touch up metal chips, and confirm base gaps ahead of sprinkler season.
- Late summer (Aug): Inspect west-sun runs; plan fall stain if boards look dry.
- Fall (Sep–Oct): Ideal re-stain window; clean swales; reset downspout extensions before heavier rains.
- Winter (Dec–Jan): Walk after fronts; re-crown any collars that flattened; plan structural fixes for dry, cool days.
For a comprehensive, step-by-step seasonal plan, see Regular Fence Maintenance in Central Texas—it complements this inspection checklist nicely.