
The “right” fence height in Austin balances privacy, local rules (HOA + city), site conditions (slopes, rock, trees), and budget, ensuring that property owners are complian . Most backyards land at 6 ft for privacy, 4 ft for front/visibility areas, and 7–8 ft for special cases like second-story neighbors or busy road exposure—provided approvals allow it. Height alone isn’t the whole story: post embedment, crowned collars, base gaps, and panel layout determine whether taller fences stay straight and quiet in Austin’s expansive clays and limestone belts. Get approvals first, size posts and footings for height and wind, and price out both materials and the soil/rock methods needed to reach proper depth. Then pick a height that gives you the privacy you want—without surprise change orders.
Why height decisions in Austin are different
Austin yards aren’t flat rectangles with perfect soil. In the same block you’ll find sticky clay that swells after storms and limestone shelves that stop a post hole at 18″. Winds channel between houses, and many neighborhoods back onto greenbelts or arterials. If you choose a height before you understand the ground and the applicable fence laws , you risk a fence that leans, chatters, or blows out gates after the first spring front.
Bringing Atlas Fence Company in early means you’ll pair height with post size, embedment, and drainage that keep the line straight for your fence projects —so the fence you see on install day is the fence you still have next summer.
What privacy really takes (and when 6 ft isn’t enough)

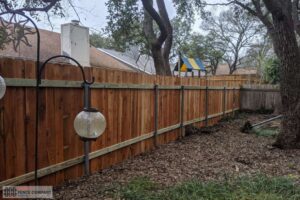
Most Austin backyards choose 6 ft privacy because it blocks sightlines from adjacent patios and ground-floor windows. But privacy depends on grade differences and seating heights:
- If your patio sits 18–24″ above the neighbor’s yard, a 6 ft line may feel like ~4.5–5 ft from your chair.
- Second-story windows can still peek over a 6 ft line; mitigate with a local 7–8 ft segment or a screen wall near the seating area (if approved).
- On descending slopes, daylight under panels grows; stepping panels preserves functional height.
- Vegetation can add “soft height” where approvals cap the fence: muhly, evergreen sumac, or hopbush clumps behind the fence edge fill a visual gap while keeping airflow.
Height is a tool—not the only one. Sometimes a solid fence of 6 ft with top cap, tight boards, and a rock curb at dips feels more private than a poorly set 8 ft that moves with wind.
Code, HOA, and neighbors: approvals before inches
Most conflicts happen above the ground, not in it. Do these steps before you pick a number:
HOA & neighborhood style
- Many communities restrict front yard height to 3–4 ft and cap rear/side yards at 6 ft, with case-by-case 7–8 ft allowances near roads, pools, or odd grades.
- Some greenbelt edges require open metal profiles to preserve views from trails.
City rules & visibility
Corner lots have sight triangles at driveways and intersections. Even a “legal” height can be problematic if it blocks views—expect to step down near corners and alley approaches.
Neighbor coordination
For shared lines, align on face side, height, stain color, and gates in writing. This is where many last-minute re-dos happen; handle it before demo.
For a deeper approvals refresher—what HOAs and the City commonly look for—skim this primer: Fence Regulations & HOA Rules in Austin.
Cost levers and how height changes your budget
Raising height isn’t just “more boards.” It affects structure, labor, and sometimes equipment:
- Materials: +12–20% going from 6 ft to 7 ft; +25–35% for 8 ft (more picket area, taller posts/rails, heavier hardware).
- Structure: Taller fences need deeper/larger footings. In clay, add depth; in limestone, expect core-drilling—a distinct line item.
- Labor: Stepping on slopes, coring rock, and setting 4×6 posts at corners/gates add hours—worth it for stability.
- Finish: More surface area = more stain; plan the coating budget accordingly.
- Design alternatives: A 6 ft with strategic 7–8 ft “privacy pocket” near the seating area can cost less than running 8 ft across the entire back.
Pro tip: ask your estimator to show a height split on the proposal: material + footing changes + potential rock coring. That keeps “hidden cost” surprises off the table.
Structural specs by height: posts, footings, hardware
Height and wind work together. The taller you go, the more you must respect embedment and drainage.
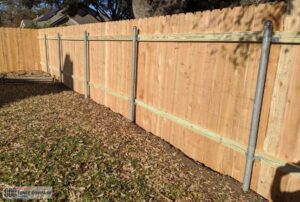
At 6 ft privacy
- Posts: 4×4 nominal; 4×6 at corners, gates, and step transitions.
- Embedment: 30–36″ in clay; core-drill 8–12″ into limestone where rock is shallow.
- Footings: 6–8″ compacted ¾” rock under each post; crowned concrete collars 1–2″ above grade, sloped from wood/steel.
- Base gap: 2–3″ under bottom boards/rot boards to stop splash-wicking.
- Hardware: exterior-rated coated or hot-dip galvanized; through-bolts at gates.
At 7 ft privacy
- Posts: 4×4 minimum; strongly consider 4×6 along windward runs.
- Embedment: 36–42″ in clay; core-drill limestone consistently at shallow zones.
- Rails: Add a mid-rail or use thicker rails to prevent panel racking.
- Wind relief: introduce hidden control joints in long spans.
At 8 ft privacy
- Posts: 4×6 standard; steel posts common on corners and gates.
- Embedment: 42″+ in clay; limestone core-drill nearly guaranteed in west/northwest.
- Gates: steel frames with adjustable heavy hinges and ~1″ threshold clearance over a broomed concrete pad.
- Panel weight: watch sag; top caps help stiffen and shade end grain.
No matter the height, keep irrigation off faces and never let collars finish flat. A crowning trowel beats a “bigger” flat collar every time.
Height on slopes and greenbelt edges
Slopes can steal effective height if you don’t step the line:
- Stepping vs. racking: Stepping keeps boards vertical and the top level relative to each panel. Racking angles pickets—fine for minor grade, but it exposes odd gaps on bigger slopes.
- Low-side daylight: Close with rock curbs or skirt mesh, but leave weeps so water passes.
- Greenbelt edges: If approvals require see-through metal, you can still get privacy with a local 7–8 ft screen wall near the seating area (inside your yard), while keeping the rear line open to the view.
Special cases: pools, corner lots, and view corridors
- Pool yards: You’re balancing barrier safety and sightlines. Height often stays at 4–6 ft for code; the trick is hardware (self-closing, self-latching) and rock-solid posts so gates don’t drift out of spec.
- Corner lots: Expect visibility triangles at driveways/intersections. Taper or step down near corners; switch to open profiles in the sight cone.
- View corridors: Preserve the view where it matters and go taller only where needed—for example, behind a grill or hot tub or against the one neighbor window that looks into your dining terrace.
Design tricks that “feel taller” without breaking rules
- Top cap + tight boards: cleans the sight line and calms wind chatter, which “reads” as more solid.
- Planter elevations: a slim raised planter inside the fence adds seated privacy without adding fence height.
- Native evergreen clumps: plant Hopseed (Dodonaea) or Texas mountain laurel in strategic triangles to block the one troublesome view.
- Color and sheen: mid-light, low-sheen stains reflect heat and hide dust; dark espresso looks tall but runs hotter and shows spotting.
- DG toe band: a 6–12″ decomposed-granite strip along the fence toe keeps the base crisp, speeds drying, and visually lifts the line.
Timeline from estimate to walkthrough
Here’s a realistic Austin cadence when height questions are in play:
Estimate request → on-site consult (2–7 days)
Probe for soil/rock, check slopes, map visibility issues. Decide where extra height is actually needed.
Proposal & approvals (3–14 days)
Proposal lists height by segment, embedment targets, core-drill policy, and hardware upgrades for taller sections. Submit HOA/city packet early and keep PDFs.
Build week (2–5 workdays depending on length/height)
- Day 1: layout, probing, selective demo.
- Day 2: footings—deeper holes for taller segments; gravel beds + crowned collars everywhere.
- Day 3–4: panels, steps, control joints, rock curbs.
- Day 4–5: gates and threshold pads; latch tuning.
- Stain: fall or mild spring window; keep irrigation off faces 48–72 hours.