
TL;DR:
Corner lots and driveway approaches aren’t just about style—they’re about clear sightlines for cars, cyclists, and pedestrians. The fix isn’t guesswork: lay out a visibility triangle, set the right panel heights within it, choose low-profile corners and gate strategies that don’t block views, and step your fence to match grade without creating blind spots. If you want a team that translates plans into a safe, review-friendly layout, Atlas Fence Company can mark the geometry on-site and build a fence that looks good and passes the safety inspection.
Why visibility triangles matter on corner lots and driveways
The purpose of a visibility triangle is straightforward: when backing out, turning, or crossing at an intersection, you require clear lateral views. Tall, solid elements near the corner or driveway edge can hide approaching traffic, kids on bikes, or dogs on leashes; a solid fence in these areas can create visibility issues and may not meet local safe fencing code requirements. That’s why many neighborhoods and review bodies want lower profiles or see-through sections in those zones. Ornamental fences are often preferred in visibility triangles to comply with safe fencing code requirements.
A good fence plan acknowledges this safety reality before it becomes a correction notice. The bonus: trimmed, intentional corners often look cleaner and make small yards feel bigger.
What reviewers and neighbors look for (in plain English)
Most reviewers don’t expect homeowners to speak code—they want three things:
- A clear sketch showing where sightlines remain open.
- A predictable height story that drops in the triangle and rises outside it.
- Consistent materials and tidy corners so the fix looks designed, not improvised.
Neighbors appreciate the same thing—especially on sidewalks where kids zip by. Coordinating with adjacent property owners can help prevent disputes and ensure your project complies with local regulations. Your plan should say, “We protected the view and kept the yard beautiful.”
For broader context on what local HOAs and review boards usually ask for, scan our primer on Fence Regulations & HOA Rules in Austin and bring those expectations to your sketch. Before starting your fence project, it’s important to obtain HOA approvals and fully understand HOA regulations, as these can be more restrictive than city codes and are essential for proper compliance.
Mapping the triangle on your property without special tools
You don’t need a surveyor’s kit to get close. Try this quick field method:
- Mark the curb reference points: Identify where sidewalks or curb lines meet near your corner or drive mouth.
- Run two measuring tapes: One along each leg from the corner reference; your HOA guidance will suggest a distance on each side.
- Snap a chalk line between those points**:** That diagonal is the “hypotenuse” of your triangle.
- Transfer to your fence line: Before marking the triangle, verify your property line and property boundaries to ensure the fence is placed correctly. Use strings from the reference points to locate where the diagonal crosses your property edge; that’s where the lower profile zone should begin and end.
We’ll repeat this with string lines and a laser on install day so the geometry you drew is exactly what gets built—no surprises. A recent property survey can help ensure your fence is accurately placed and complies with local regulations.
Fence permit requirements: Navigating Austin’s building permit process
Before you start your fencing project in Austin, it’s crucial to understand the city’s fence permit requirements. The City of Austin has clear rules for residential fences to help property owners ensure compliance with local laws, protect neighborhood safety, and avoid costly corrections down the line.
When do you need a fence permit?Most residential fences require a building permit if they exceed certain height limits, are located near property lines, or are part of a swimming pool barrier. Even if your fence seems straightforward, Austin’s local laws and city ordinances may trigger permit requirements based on location, height, or materials. Always check the latest city code or consult with the Development Services Department to confirm if your fencing project needs a permit.
Height choices that protect sightlines and still feel private
Lowering everything to knee level isn’t the only answer. In the triangle, consider:
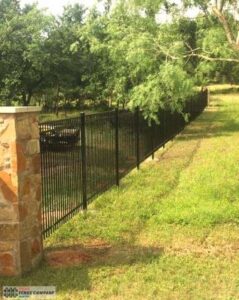
- See-through panels like ornamental metal that keep the eyes’ path open while defining the boundary. Ornamental fences are often allowed to be taller than solid fences within local height restrictions.
- Lower shadowbox or lattice accents that soften the look without creating a wall.
- Stepped transitions so your fence height rises smoothly as you leave the triangle—no abrupt “shoulder” that looks hacked.
Outside the triangle, return to your preferred privacy height. Solid fences may be used outside the visibility triangle, but must still comply with local height restrictions. This creates a “fastlane/quietlane” balance: safety at the corner, calm at the patio.
When you’re ready to translate these ideas into posts, footings, rails, and panel choices, skim our fence installation overview—it shows how we size and step components under Austin conditions.
Corner details that read “intentional” instead of patched
Corners draw the eye. A few craft moves make them sing:
- Chamfered or radiused returns that widen the approach and avoid a boxy pinch.
- Cap & trim to finish the top of lowered sections elegantly.
- Consistent picket rhythm through the transition so the height change feels designed.
- Corner posts set slightly taller with a clean cap to anchor the geometry.
Think of the corner like a front porch detail—it should welcome from the street and feel composed from your side.
Driveway and alley approaches: gate placement that works
Gates change traffic patterns and sightlines. Aim for these wins:
- Move the gate leaf away from the triangle: Set hinge posts just outside the lowered zone so the leaf never blocks the critical view when open.
- Prefer outswing pedestrian gates that open toward the sidewalk only if allowed and safe; otherwise inswing with clear latch visibility from the drive.
- For vehicle entries, a sliding gate keeps the approach clear where swing arcs would block a view.
- Use open-profile gate infill (ornamental or spaced accents) inside the triangle rather than solid privacy planks.
- For properties with swimming pools, local safety regulations require pool fences with self latching gates. Self latching gates are a key requirement for pool fences and swimming pools to ensure child safety and code compliance.
If you’re debating swing versus slide or single versus double leaf on a drive, our gates page shows configurations that protect sightlines without sacrificing security.
Slopes, crowns, and drainage without blocking views
Corner and drive radii often include street crowns and driveway slopes. Guard against two common traps:
- Bottom edges that follow grade too tightly: Keep a consistent reveal so the lowered section doesn’t accidentally grow taller where the sidewalk dips.
- Drainage dams: A low panel can still block water if it’s continuous to the ground. Step the bottom, include kick boards where needed, and leave micro-gaps that maintain flow without inviting pets to slip out.
A straight top line and a smart bottom line make the whole corner read calm and intentional.
Materials that behave better in sightline zones

Selecting the right fence materials is crucial to ensure compliance with local regulations, HOA guidelines, and safety standards, while also enhancing your property’s curb appeal.
- Ornamental aluminum or steel: Slim pickets, high visibility, and low maintenance—ideal inside triangles.
- Chain link fences: Durable and see-through, chain link fences are a practical option for visibility triangles where allowed, meeting many code requirements for safety and compliance.
- Composite slats with open spacing: Modern look with durable color where a lightly screened corner is acceptable.
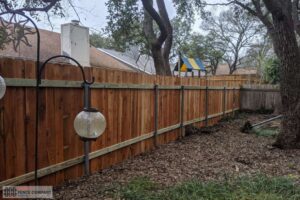
- Cedar with accent cutouts: Warmth where you need some privacy but still want light and hints of view.
Whichever fence materials you choose, keep post specs modest in the triangle—chunky posts defeat the “open” goal. Strength lives in footing geometry and rail connections, not bulk.
HOA and review packets that glide through approval
Make approval easy with a tidy packet:
- Site sketch with your triangle drawn and heights labeled.
- Site plan and site plans showing the proposed fence location and compliance with property boundaries and city regulations.
- Elevation snippets showing the lowered corner and the stepped transition.
- Material callouts (ornamental profile, picket spacing, cap & trim notes).
- Photo precedents from your neighborhood if your HOA likes “match existing.”
Obtaining HOA approvals is essential for master-planned communities, and consulting land development information services can provide valuable guidance on permit applications, site plan reviews, and compliance with local regulations.
If your subdivision posts review windows weekly, aim to submit ahead of meeting days so you’re on the next agenda. Include notes that reference safety and sightlines—reviewers respond well to proactive language.
Common mistakes and easy wins

Mistake: Lowering only one tiny panel at the corner. Win: Extend the lowered or open section far enough that the diagonal sightline is truly clear; don’t force drivers to peer around a sliver.
Mistake: Dropping height but using bulky corner posts. Win: Slim posts with strong footings keep strength up and sightlines open.
Mistake: Setting a solid swing gate in the triangle. Win: Use open-profile gate infill or move the hinge line outside the triangle.
Mistake: Ignoring grade changes. Win: Step tops and bottoms cleanly; don’t let a dip turn a “low” panel into a mid-height obstruction.
Mistake: Patchwork materials. Win: Match finishes and rhythms so the safety solution looks like it belongs.
Mistake: Failing to recognize permit triggers, such as exceeding height limits, using restricted materials, or building near intersections, which can result in forced removal of the fence by authorities if it does not meet code requirements. Win: Build a compliant fence that meets all local code requirements and permit triggers to avoid penalties, ensure long-term safety, and prevent forced removal.