
TL;DR
This Circle C homeowner needed stronger privacy around an entertaining patio without sacrificing the long, oak-framed view of the greenbelt behind the property. The solution combined a tiered privacy strategy (6′ cedar screening that steps down toward the view), a see-through rear line in black steel + welded wire, core-drilled posts where limestone showed up shallow, and drainage improvements (DG mow strip + crowned collars) to keep lines straight after storms. Final touches included color-cool stain, gate hardware tuned for summer expansion, and low-water native plants that soften the fence without trapping moisture. Result: a backyard that feels secluded at the seating areas yet opens dramatically to the greenbelt—no “boxed-in” vibe, enhancing the overall curb appeal.
Project context: what makes Circle C tricky (and fun)
With greenbelts snaking behind cul-de-sacs and live oaks shading long backyards, Circle C lots can deliver big views—and equally significant challenges. Many properties sit on thin clay over limestone, so you often hit rock shallow in some holes and sticky clay in others, which can affect property value. Irrigation systems installed years ago don’t always align with new hardscape, and summer afternoon sun bounces off light patios, raising radiant temperatures along the fence face. Additionally, HOA guidelines often favor restrained color palettes and a tidy appearance from the trail side.
For this home, the owner’s wishlist was crisp:
- Block direct views from two neighboring second-story windows into the main seating area and grill station.
- Keep the greenbelt panorama untouched along the back third of the yard.
- Protect wood at the ground line, since their previous fence developed rot right where the soil and splash met the bottom boards.
- Limit maintenance, especially in July and August.
With Atlas Fence Company, the plan focused on reading the site’s micro-conditions and designing to them rather than forcing one fence type across the entire run.
Goals & constraints: privacy where it matters, transparency where it counts
We ranked design moves by use zones, not property lines:
- High-privacy zones around the dining terrace and grill got tall, tight screening.
- Sightline lanes toward the greenbelt feature open pickets and discreet mesh, allowing the eye to look straight through to the oaks.
- Transition zones at corners and gate approaches used stepped heights and angled returns to prevent tunnel vision and to break jump cues for neighborhood deer.
Constraints included a shallow limestone shelf near the rear right corner and an existing French drain we needed to preserve. Homeowner preference: avoid spear-tops and high-gloss finishes, keep the rear line visually minimal, and choose heat-smart colors to avoid scorching hands on August afternoons, all while considering cost.
Site walk: soils, grades, sun, and HOA cues
A 45-minute walk uncovered four key realities:
- Spotty limestone: a dozen probe holes showed rock within 14–18″ at the back right and deeper than 30″ elsewhere.
- Cross-slope from left to right meant stormwater drifted toward the corner where the old fence had leaned.
- The west sun hit the dining area hard after 4 p.m., making the old, dark espresso boards too hot to touch.
- HOA tone: flat-top metal profiles are standard, and neutral wood stains tend to be approved quickly.
Concept design: the three-zone perimeter plan
We mapped the backyard into three functional bands:
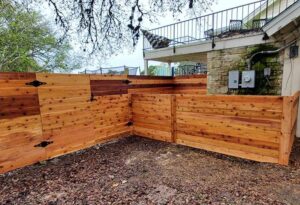
Zone A — Privacy Core (house-adjacent)
- 6′ cedar privacy with a top cap and tight board pattern lines the patio and grill run.
- Panels step down subtly as they approach the view corridor to avoid a high wall effect.
- Posts are set with gravel beds and crowned collars to prevent water from seeping into the ground line.
Zone B — Transition (toward the greenbelt)
- A hybrid screen: cedar frames with black welded-wire infill create texture without heft.
- The vertical rhythm remains consistent with Zone A, but transparency increases, allowing the eye to begin traveling through to the trees.
Zone C — View Line (greenbelt edge)
- Flat-top ornamental steel with a black PVC-coated welded wire backer (tight aperture at the low end, more open at the higher end) maintains a clean horizon line and discourages deer squeezes.
- Posts are core-drilled into limestone where rock is shallow, set with non-shrink grout for lateral strength.
The zones meet at angled returns rather than 90-degree “stops,” preventing visual dead ends and eliminating easy run-ups for deer at interior corners, which also adds to the overall durability of the fence.
Materials & details that made the difference
Posts & footings
- 4×6 ground-contact cedar in the privacy core, set on 6–8″ compacted gravel with collars raised 1–2″ above grade and sloped away.
- Galvanized steel in the view line for long-term plumb, with core drilling into limestone to 8–12″.
- All fasteners are hot-dip galvanized or exterior-rated coated; mixed-metal stacks are avoided.
Panels & infill
- Tight vertical cedar face to resist climb at the patio, with concealed rails where possible.
- Black welded-wire panels (small apertures at the bottom 24–36″, slightly larger above eye level) to maintain pet security and visual lightness.
Noise & wind
The patio side needed some wind softening without bulk; the vertical boards, combined with a low, airy native planting, provided a turbulence break without turning the yard into a box.
Service access
A wide man-gate near the side yard allows for mower and wheelbarrow clearance, while keeping the primary view corridor free of hardware clutter.
During our fence installation in Austin, we utilized gravel beds and crowned collars in cedar zones, and core-drilled posts where limestone was shallow, to maintain plumb lines through storms.
Gate strategy, hardware, and day-to-day usability
We treated the gate as a daily-use appliance:
- Rigid steel frame with cedar infill—light enough to swing easily, stiff enough to stay square.
- Adjustable, fine-texture hinges that reduce heat transfer and maintain alignment through seasonal expansion.
- Bottom clearance at ~1″ over a broomed-concrete pad to stay out of storm puddles.
- Place the latch out of the strongest afternoon sun to avoid hot metal at grab points.
Drainage & erosion control so the fence stays straight
The old fence had rickety areas where water pooled during storms. We added:
- A DG (decomposed granite) mow strip 12–18″ wide along the privacy core to keep splash off boards and speed drying.
- A subtle swale on the uphill side that carries water to the existing French drain inlet.
- Rock curbs at two low dips along the view line to maintain tight daylight gaps without impeding flow.
- Collars beveled at all wood posts; no flat concrete “bathtubs.”
These moves mean the new line sheds water, dries fast, and resists seasonal clay swell.
Finish & color: cooler surfaces, lower glare.
Direct west sun on the patio argued for a cooler-running stain:
- We finished the cedar with a semi-transparent, neutral taupe-gray, and scheduled professional fence staining so that refresh cycles line up with the cooler fall weather.
- Top caps reduce edge checking and create a clean shadow line.
- Metal components were coated with matte black powder, featuring a delicate texture, to reduce glare and fingerprints.
For homeowners considering color choices under the Austin sun, for more context on balancing sightlines along greenbelts, see Privacy Fence on Austin’s Greenbelts.
Planting layer: low water, high impact along the fence toe
We paired the new fence with drought-tough natives that won’t trap moisture:
- Lindheimer muhly in 5-plant drifts for fall bloom haze and light screening.
- Blackfoot daisy and Damianita to brighten the base while keeping the toe airy.
- Frogfruit to knit the DG edges, where a living carpet makes sense.
- All plantings set 6–12″ off the fence to maintain airflow; drip emitters aimed away from boards.
Timeline, crew workflow, and homeowner communication

Day 1: Layout, utilities check, demonstration of failing sections, and post-hole probing; switch to core-drill rig where limestone is encountered.
Day 2–3: Set posts (gravel beds in cedar zones, grout sets at rock), form and finish collars, pour small gate pad.
Days 4–5: Hang panels, install hybrid welded-wire sections, set the gate, and tune the hardware.
Day 6: DG mow strip, rock curbs, swale cut and tie-in; final cleanup and punch list.
Day 7 (AM): Apply stains in a favorable weather window, masking the patio and planting beds to protect them.
The homeowner received progress texts with photos at the end of each day, along with a brief care sheet for stain cure and gate adjustment checks.
Results, lessons, and maintenance road map
What changed immediately
- Seated guests gained line-of-sight privacy from the two neighbor windows without closing off the backyard.
- Afternoon temperatures near the gate hardware felt noticeably cooler thanks to finish choices and shaded latch placement.
- Stormwater now skirts the line instead of bulling into low posts.
Lessons worth sharing
- Mixing opaque and transparent zones can make a yard feel larger: the eye reads depth rather than a perimeter wall.
- Small details—crowned collars, a DG toe, and angled returns—often matter more than sheer fence height for day-to-day satisfaction.
- On greenbelt edges, core-drilled steel posts are cheap insurance against lean in that one rocky corner every lot seems to have.
Maintenance plan
- Spring: rinse dust/pollen, check base gap, tighten gate bolts.
- Late summer: quick visual on west-facing boards and touch up stain if water stops beading.
- Every 2–3 years: full penetrating recoat on cedar sections; inspect rock curbs and DG band after big fronts.