
TL;DR
Big, beautiful cedar gates fail when structure, hardware, and ground conditions don’t match the load. In Austin, the recipe that doesn’t sag is: a stiff frame (metal or properly braced wood), oversized hinge hardware set on deep posts (steel preferred), adjustability for seasonal movement, and latch geometry that closes the same way in July and January. Get the skeleton right first, then hang the cedar as a skin—not the other way around. If you want a gate spec that suits your slope, wind, limestone/clay soil, and driveway layout, our team at Atlas Fence Company builds and tunes heavy gates across Austin neighborhoods, including options for cedar gate hardware austin no sag.
Why Heavy Cedar Gates Sag (and How to Prevent It)
Sag is gravity finding the weakest link. On a 3.5–5 ft yard gate or a 6–8 ft driveway leaf, the culprits are predictable; understanding how to implement anti sag techniques can help.
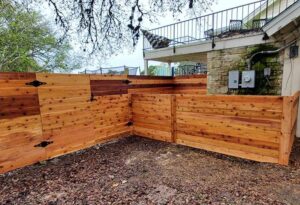
- Flexible frame: A pretty cedar face without a stiff skeleton twists and creeps.
- Underbuilt posts/footings: Shallow embeds in clay or unbonded anchors in limestone let the hinge line lean.
- Non-adjustable hinges: Wood moves. If the hardware can’t take up slack, the latch won’t meet after a season.
- Latch leverage: Long, heavy leaves need a latch that pulls and holds—not a flimsy gravity tab that pops in the wind.
- Bottom clearance: A leaf that barely clears the grade will drag the first time the soil swells.
Prevention path: design around load paths (where the weight goes), add adjustability, and protect against wind and moisture to keep the geometry stable for optimal privacy .
If you’re diagnosing a gate that’s already dragging, start with quick field checks and shims from this companion read: Diagnosing Gate Sag & Drag: Quick Tests.
Austin Realities: Slope, Wind & Soils You Must Design For
- Slope & crowns: West Austin drives often slope up toward the garage; inward swings can drag. Even yard gates flare at stone mow strips. Plan swing direction and bottom reveals around the grade.
- Wind corridors: Greenbelt edges act like wind tunnels. Solid cedar leaves are sails. Size hinges, add positive stops, and consider louvered skins on exposed runs.
- Soils:
- Limestone shelves (Westlake/Lakeway): Core-drill hinge posts and epoxy anchor for true, plumb pivots.
- Expansive clay (Circle C/Round Rock): Deeper, bell-shaped footings and steel posts resist heave that throws latches out of alignment.
If you’re pairing a new gate with fence work during fence installation , align posts, rails, and caps in one plan. Our gate installation team in Austin designs the structure and controls as a single system so the gate doesn’t fight the fence or the opener down the road.
Frames That Stay True: Steel, Engineered Wood & Smart Bracing
Hierarchy of stiffness (for heavy cedar) and various styles :
- Welded steel frame + cedar skin (top choice)
- Why it wins: Steel carries the weight; cedar provides the look.
- Details that matter:
- Tube steel (e.g., 1.5″–2″ square, appropriate wall) welded square, with diagonal or K-bracing inside the plane.
- Hidden screw rails so cedar boards float slightly and can be serviced board by board.
- Sealed cut ends on cedar to limit moisture cycling (weight swings and cupping = latch drift).
- Engineered wood frame (if metal isn’t desired)
- Recipe: 2×4/2×6 kiln-dried or laminated members; a full-length Z-brace from the latch side top to the hinge side bottom; and blocked corners to resist racking.
- Must-haves: Exterior screws (not nails), glued/bolted gussets at corners, and a mid-rail behind the latch line.
- Decorative face-only (do not do for heavy gates)
- Face boards nailed to rails with no frame = guaranteed creep. If you inherit one, retrofit a bolt-on steel perimeter to rescue it.
Horizontal cedar? Keep spans short and use dual-screw patterns on each board to prevent “smiles.” Horizontal looks modern but needs discipline to avoid long-term droop.
Posts & Foundations: Depth, Diameter, and Rock vs. Clay
The hinge line is your “spine.” Overbuild it.
- Post choice: Steel posts (round or square) are much stiffer than 4×4 wood posts. Wrap in cedar for warmth. Use 6×6 wood minimum if staying all-wood, and only with proper embedment.
- Embedment & pier design:
- Limestone: Core-drill to competent rock; set steel with epoxy or grout.
- Clay: 30–42″+ depth with belled or oversized footings; keep tops domed to shed water.
- Gate pairs (driveways): Flanking posts should mirror each other in size and footing so the latch line doesn’t “walk” under wind load.
- Conduit & wiring: If you’ll ever automate, run conduit now (even for manual gates). Retrofitting through rock is pricey.
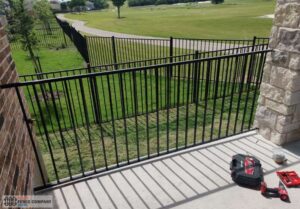
Hinge Systems: Types, Load Paths & When to Upsize
Hinges are the quiet heroes. Choose by weight, wind, and adjustability.
- Adjustable barrel/butt hinges (heavy duty):
- Use for: Wood-frame gates weighing ~200–250 lb that require micro-adjustment.
- Pros: Clean look, vertical and lateral adjust in situ.
- Key spec: Greaseable pins; through-bolted to frames—not just lagged.
- Strap hinge + gudgeon/pintle sets (classic, very strong):
- Use for: Heavier cedar skins or decorative frames where you want the load spread across the face.
- Pros: Big bearing surfaces; excellent for rustic/cedar aesthetics.
- Notes: The strap length should be ~½ to ⅔ of the gate width to distribute torque.
- Ball-bearing or thrust-bearing hinges:
- Use for: Very heavy leaves and wind zones. Bearings keep swinging smoothly and reduce sag creep.
- Callout: Lock the hinge axis plumb; even tiny lean adds drag at the latch.
- Continuous hinges (architectural “piano” style, exterior-rated):
- Use for: Slim pedestrian gates that need tamper resistance; less common on heavy cedar due to point-load needs.
Upsize triggers: gate width > 48″, height > 72″, or excellent face in a windy corridor. When in doubt, add a third hinge to reduce the moment on each fastener group.
Latch Strategy: Positive Capture, Wind Discipline & Daily Rhythm

A great latch does three things: pulls the leaf into alignment, holds it against the wind, and closes predictably after 5,000 cycles.
- Magnetic or mechanical “positive capture” latches:
- Draw the leaf into a strike pocket and keep it there. Less rattle, less wear on hinges.
- Adjustable strikes & keepers:
- Seasonal wood movement? Dial it in with a wrench, not a pry bar.
- Drop rods/cane bolts (double gates):
- Use sleeved receivers in concrete to lock the passive leaf; add a positive stop so rods land in the same spot every time.
- Self-closing?
- For pool barriers or kid/pet zones, pair the latch with adjustable spring closers or controlled closers to prevent slamming (slamming = fastener creep).
- Handedness & ergonomics:
- Place latches where users naturally reach; high enough to discourage toddlers, low enough for all adults to use smoothly.
Gates for Driveways vs. Yard Entries: What Changes
- Driveway leaves are heavier and see the wind head-on. Favor steel frames, bearing hinges, and magnetic latches with positive stops at both open and closed. If automating later, choose latch hardware that plays nice with arms or rack drives.
- Yard gates (3–5 ft) can succeed with engineered wood frames and strap hinges—if posts and latch geometry are right. Add kick plates or tight bottom trims to block pet escape and visual “daylight.”
Hardware & Fasteners: Small Choices, Big Outcomes
- Through-bolts over lags on hinge plates wherever possible; washers sized to spread load.
- Exterior-rated screws (coated or stainless) for cedar boards; avoid black drywall screws that snap.
- Anti-seize & grease hinge ports; schedule maintenance.
- Stops & bumpers to protect latches and keep repeated hits from walking the posts.
Finish & Moisture Control: Keeping Weight Stable
Cedar’s beauty comes with hygroscopic movement. Limit the swings:
- Seal cut ends on every board; back-brush stain into the end grain.
- Mid-tone, penetrating stain with UV-stable pigments resists cupping and keeps weight stable across seasons.
- Gap discipline: Tiny, consistent board gaps on horizontal skins let water escape; board-on-board vertical skins prevent peek-through as boards season.
(If you’re planning color/finish with performance in mind, our staining crews can specify a UV-stable, non-film system and coordinate shade windows so the finish actually cures right in Austin heat.)
Install Sequence & Field Tuning (Day-by-Day)
Day 0 — Walkthrough & Spec
Measure slope/crown, wind exposure, and soil. Decide between swing and slide (for driveway gates), choose the frame type, hinge spec, and latch package. Confirm bottom reveal and stop locations.
Day 1 — Posts & Foundations
Core-drill or auger; set steel posts true and plumb. In clay, bell footings. In rock, epoxy anchors and grout sleeves. Conduit goes in now.
Day 2 — Frame Set & Hinge Mount
Hang steel or engineered wood frame bare (no boards) to tune plumb, level, and reveals. Set adjustable hinges mid-travel so you have room in both directions later.
Day 3 — Skin & Hardware
Install cedar boards with hidden rails/screw lines. Fit latch/keeper, positive stops, and (if needed) drop rods. Set bottom trims or kick plates.
Day 4 — Tune & Prove
Cycle the gate 50–100 times. Check for leaf “bounce,” hinge heat, latch strike polish, and wind behavior. Make micro-adjustments to hinges and strike; lock in with thread locker where appropriate.
Optional Day 5 — Finish
Prep and stain in a cool window, protecting bearings and latches from overspray; re-grease after cure.
Troubleshooting: What to Adjust, Not Replace
- Leaf hits the latch low: Add a whisper of lift at the top hinge; shim the keeper upward; verify post hasn’t rotated.
- Bounce-open in wind: Install a positive latch or magnetic catch; add an adjustable stop; reduce closing speed (on self-closers).
- New drag at threshold: Check soil heave or stone lip; increase reveal a hair at the latch side and re-level.
- Seasonal mis-meet: Use the hinge’s lateral micro-adjust and the strike’s slot; do not force the leaf—save the posts.
- Cedar face cupping: Confirm finish schedule; add a back-stiffener to the worst boards, or replace individual boards without tearing the frame apart.