
TL;DR
“Zero-peek” privacy isn’t just a style choice; it’s a geometry + materials + climate equation. In Austin, wood shrinks in drought, swells after fronts, and catches severe wind along greenbelts—so your board layout must anticipate movement. The winning formula: consistent rail layout, post stiffness, and a skin that uses actual overlap (board-on-board) or precisely controlled gaps (side-by-side/horizontal) backed by shadow lines that hide micro daylight as lumber seasons. Done right, you get a fence that still looks private at year three, not just week three. Want the math done for your yard? Atlas Fence Company designs and builds privacy-first fences tuned to Austin’s wind, soils, and sun.
What “Zero-Peek” Really Means (and Why Austin Makes It Hard)
Zero-peek isn’t magic—it’s visual control under movement. Wood in Central Texas moves more than you think: cedar boards can shrink 1–3% across the grain during dry spells, then rebound after a front. Add prevailing west/south winds, crowned streets, and limestone shelves that make post setting tricky, and any tiny inconsistency turns into “daylight” between pickets.
So zero-peek is less about perfection day one and more about stability month twelve:
- The frame shouldn’t flex (stiff posts, correct rail spacing).
- The skin should overlap or self-mask minor movement.
- The layout needs shadow lines to hide seasonal micro gaps.
When we design our fence installation in the Austin program, we tune all three for your exposure, soil, and style.
The Three Levers: Gaps, Overlaps, and Shadow Lines
1) Gaps (Controlled day-one spacing)
- Side-by-side vertical: Set pickets with a hairline gap at install (typically 1/16–1/8″) so swelling won’t buckle, but shrink won’t reveal more than a hairline.
- Horizontal slats: Tiny, repeatable gaps (often 1/8″) keep the look modern but demand immaculate span control—more below.
2) Overlaps (Make gaps irrelevant)
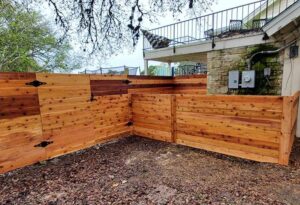
Board-on-board vertical: Alternate face/back boards so any shrinkage is covered. Standard overlap: ¾–1″ with 5½” pickets; we fine-tune to your sun/wind conditions.
3) Shadow lines (Visual camouflage)
Cap & trim, backer strips, or staggered planes add just enough relief that even if a micro gap opens, your eye reads a shadow, not your neighbor’s patio.
Rail & Post Geometry: The Skeleton Behind Privacy
A fence that waves will always peek. Keep the skeleton quiet:
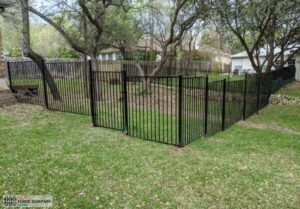
- Posts: In wind corridors or 7–8′ sections, step up to 6×6 or steel posts (cedar-wrapped if you want warmth). Stiffer posts = straighter sightlines = fewer peeks.
- Embedment: Clay needs belled, deeper footings; limestone wants core-drill + grout/epoxy. A drifting post opens perfect gaps into windows.
- Rails: For 6′ fences, use three rails; for 7–8′, go four rails. Higher rails reduce picket flutter and maintain consistent overlap tolerances.
- Seams: Stagger panel seams; long contiguous seams “breathe” under wind and telegraph uneven gaps.
If you’re replacing a tired line and want privacy actually to last, the upgrade path often starts with structure. Our fence replacement in Austin packages right-sized posts/rails before we ever talk picket patterns.
Vertical Styles: Side-by-Side vs. Board-on-Board (Specs That Work)
Side-by-Side (Budget-friendly, precision required)
- Picket spacing: Install at 1/16–1/8″ using jigs. Expect hairline daylight during August; the goal is control, not elimination.
- Picket width & quality: Straighter stock (tight grain, minimal pith) moves less.
- Rails: 3 rails minimum on 6′, four on 7–8′.
- Shadow assist: Add cap & trim—a crisp top line reduces the eye’s ability to “find” micro gaps.
- Bottom reveal: ¾–1½” over grade; step rather than rake to avoid triangular keyholes along slopes.
Where it shines: Sheltered interiors, cost-sensitive projects, north/east exposures.
True Board-on-Board (Zero-peek workhorse)
- Pattern: Alternating boards with ¾–1″ overlap; keep the backer board centered on the rail layout so the overlap reads even.
- Rail rhythm: Consistent rail heights keep backers in plane, making the overlap look seamless.
- Fasteners: Exterior screws (not nails) to maintain flatness as the wood seasons.
- Cap & trim: Optional for polish; not required for privacy.
Where it shines: Greenbelt edges, west/south exposures, and anyone who never wants to see “daylight.”
Horizontal Styles: Density, Span Control & Screw Patterns

Horizontal reads modern—and reveals any inconsistency.
- Span control: Keep spans short (typically 6–7′ between posts) and consider hidden steel or continuous backers on long runs.
- Board thickness: Slightly thicker boards resist “smiles” (mid-board sag/shadow that looks like a peek).
- Screw patterns: Use dual screws per bearing, with consistent offsets, to lock boards flat.
- Gap spec: 1/8″ is common for “privacy-dense” horizontals; match gap to visual goals and HOA rules.
- Shadow line tricks: A subtle backer or darker field behind creates an intentional shadow that reads solid from common viewing angles.
Pro tip: If you want zero-peek horizontal, we can hybridize with shiplap profiles or tongue-and-groove boards in key sightline zones (patios, windows) while using standard slats elsewhere to control budget.
Shadowbox & Louver Hybrids: Airflow Without the Peep Show
These styles use angles and offsets to hide daylight at common viewing angles while allowing air to move—great for baking yards.
Shadowbox (alternating faces)
- Pitch & coverage: Keep the offset tight and pitch consistent so you can’t see through straight-on.
- Rails: 3–4 rails, so alternating boards don’t chatter in the wind.
- Privacy reality: From extreme angles, you may glimpse slivers; from typical patio sightlines, it reads private.
Louvers (angled slats)
- Angle: 30–45° is typical; steeper angles hide more but steal airflow.
- Support: More rails/backers because each slat is a lever in the wind.
- Lux variant: Metal frame with cedar louvers for dead-straight lines in hilltop gusts.
If you’re comparing options by style and performance, this roundup helps: privacy fence styles compared for Austin—a quick look at board-on-board vs. shadowbox vs. horizontals and where each wins on privacy and wind. (We’ll send the graphic with your estimate.)
Greenbelt & Hilltop Adjustments: Wind and Grade Tactics
- Wind breaks: Solid fences act like sails. If sightlines are harsh but wind is worse, use board-on-board on the hot sides and louver/shadowbox in wind funnels.
- Post upsizing: Corners and long, exposed runs want 6×6 or steel; you’ll hear the difference on a storm night.
- Grade transitions: Step panels to keep bottom reveals tight; raked runs create triangular gaps you can’t unsee.
- Mow strips & soil: A light-tone mow strip can close gaps to the ground, stop erosion, and give you a visually “sealed” lower edge.
Gate & Corner Detailing: Where Privacy Usually Leaks
- Gates: Stiffen frames (steel or engineered wood), add magnetic or positive-capture latches, and set adjustable hinges mid-travel so you can tune for seasons. Keep the bottom reveals consistent across the swing.
- Double gates: Use drop rods into sleeved receivers set in concrete; add a positive stop so leaves meet the same every time.
- Corners & ends: Upsize posts and consider a wrap/trim detail that creates a shadow return—your eye reads “finished,” not “gap.”
Finishing & Color: Making Lines Disappear (and Stay Disappeared)
Finish can’t create privacy, but it can hide micro gaps and keep boards flatter.
- Penetrating, mid-tone stains with UV-stable pigments help prevent cupping and reduce the contrast of tiny seams.
- Low sheen reduces glare, highlighting overlaps and joints.
- Back-brushing pushes resin into the fibers, so boards move less and shadows read softer.
- Color strategy: Mid-tone browns (honey, chestnut, saddle) are forgiving; near-black on west faces runs hot and can accent every seam.
Installation Sequence: How We Lock in Zero-Peek
Day 0 – Walk & Map
Identify hot sightlines (patio, pool, neighbor windows): flag wind corridors, slopes, soil type, and HOA constraints. Choose style(s) and gap/overlap targets.
Day 1 – Posts & Footings
Set posts plumb, depth matched to soil. Corners/gates upsized. Crown concrete tops; set rails later after cure, where needed.
Day 2 – Rails & Seams
Run 3–4 rails dead level. Stagger seams; pre-layout board rhythm so overlaps land symmetrically.
Day 3 – Skin & Details
Install pickets with jigs for repeatable gaps or measured overlaps. Add cap & trim or backer strips for shadow lines. Set gates with adjustable hardware.
Day 4 – Tune & Finish
Step back at patio eye height. If a micro gap reads bright, we adjust the board, backer, or keeper. Prep clean, then stain in the cool window with a back-brush for an even, matte field.
Troubleshooting: What to Adjust When Light Sneaks Through
- Hairline appears mid-run (side-by-side): Verify board isn’t warped off the rail; swap for straighter stock or add a hidden backer strip for a shadow line.
- Gaps at the bottom of a slope: Replace a raked bay with stepped panels or add a neat mow strip to close the ground light.
- Gate peeking at latch line: Micro-adjust hinges to pull the leaf square; shift the strike plate; add a positive stop so wind can’t bounce it.
- Horizontal “smiles”: Add a concealed stiffener/backer at mid-span and evaluate screw pattern.
- Seasonal shrink highlight: Sometimes the best fix is finish—a mid-tone refresh reduces contrast so the eye stops finding seams.