
TL;DR
Most pool-gate failures boil down to three fixable things: the gate won’t self-close and self-latch every time, the latch height/reach isn’t kid-safe, or gaps/footholds make the latch easy to defeat. You rarely need a new fence line—just smarter hinges, a magnetic self-latch in the right spot (or inside-only with shielding), and reach-control plates. Below is the exact retrofit sequence we use around Austin to pass on the first re-inspection. For local examples and scheduling, you can check recent projects and book a visit.
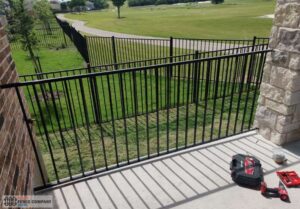
Why older gates fail (and how to spot it in 5 minutes)

Common patterns we see across Westlake, Circle C, and Lakeway backyards:
- Gravity latches that need a shove to catch (or miss the strike after a season).
- Non-adjustable hinges that don’t pull from a small opening.
- Low latch placement or a release that’s reachable through nearby gaps.
- Deck settling that opened the under-gate reveal just enough to lever or reach.
Quick self-check: from a 6–12 in. crack and again from ~30°, let go. If it doesn’t click shut both times, you need tension and alignment—now.
Retrofit parts that actually work
- Self-closing hinges (adjustable): We preload tension so the gate closes from small cracks and soft 30° releases. Heavier/windy exposures often get three hinges.
- Magnetic self-latch + backed strike: Magnetic latching tolerates tiny seasonal shifts. We mount the strike to a steel backing tab/plate so the screws never loosen into wood alone.
- Reach-control shields: Slim steel/cedar cover strips or a narrow stile around the latch zone remove fish-through paths while keeping the look clean.
- Bottom control: Re-set the smallest practical under-gate gap over hardscape (≈1–2 in.). On swales, raise slightly and tune hinge tension so it still latches without a slam.
Thinking about a new gate frame while you’re at it? Compare options and operator packages on our gate installation & automation page.
Latch height & reach control: two clean paths to compliance
Path A (simplest): Put the release at or above 54 in. measured from the outside finished surface. No hand can reach it, no fishing needed.
Path B (design forces it lower):
- Move the release to the poolside and
- Shield it so no opening within ~18 in. (horizontal radius) on the outside lets a hand, wire, or tool snag it.
- Keep ornament and horizontal members out of that 18-in. halo.
Pro move: Tape a “mock release,” then try to hook it from outside with a shoelace or pencil. If you can, a kid can. Add shielding.
Gaps, footholds & “fishing” the latch
- Under-gate reveal: Hold ≈1–2 in. over hardscape. If pavers settle, readjust—inspectors notice.
- Side reveals: ⅛–3⁄16 in. at hinge and latch sides—consistent and smooth so the latch tongue can’t be manipulated from outside.
- Footholds: Avoid scrolls, horizontal rails, or proud bolts in the latch zone; they make climbing/reaching easier.
- See-through route: If any opening leads straight to the release within 18 in., cover it with a strip or interior reach block.
If the frame or posts need structural help, we handle it through fence repair services in Austin, so you don’t have to tear out the whole l
Swing direction, reveals & alignment (year-two proof)
- Swing away from the water. Set the hinges so the “open” head faces the safe side.
- Positive stop: Add a stop at the strike so the tongue lands perfectly every time.
- Boxed frame: 1½-in. Tube perimeter with an internal brace on wide gates keeps the latch side square through heat/cold cycles.
- Footings: Posts 30–36 in. deep with bell bottoms in expansive clay; confirm plumb after backfill settles.
Finishes near water: rust control without the streaks

- Duplex coating on metal: Hot-dip galvanizing + zinc-rich primer + super-durable polyester powder coating.
- Fasteners: Stainless or hot-dip galvanized; isolate dissimilar metals with nylon washers.
- Weeps & drip edges: Open weep holes in hollow sections; add drip caps to prevent splash from collecting in joints.
- Touch-ups: Any fresh cut/weld gets conversion, zinc-rich primer, and a compatible topcoat—immediately.
For bigger-picture barrier layout and style choices around pools, skim our pool fence guide for Austin—it’s the homeowner-friendly overview your inspector wishes everyone read.
Austin-tuned specs box (copy/paste)
Gate & posts
- Frame: 1½ × 1½ in. steel tube (0.083–0.095 wall), boxed perimeter; internal brace if width >48 in.
- Posts: 2⅜ in. SS20/SS40 round or 2½ in. square; footings 30–36 in. deep, 10–12 in. dia.; bell bottoms in expansive clay.
- Swing: Away from the pool; positive stop at strike side.
Hinges & closer
- Two adjustable self-closing hinges (three on heavy/windy gates).
- Tension: must self-close from a 6–12 in. crack and ~30°.
Latch & reach control.
- Preferred: release ≥54 in. above outside finished surface.
- Alternative: inside-only release with 18-in. reach shield; no opening >½–1 in. within that zone.
- Strike backed by a steel tab/plate; thread-locker on fasteners.
Gaps & reveals
- Under-gate gap ≈1–2 in. (hardscape); up to 2–3 in. at swales while maintaining barrier intent.
- Side reveals ⅛–3⁄16 in. at hinge/latch.
Metals & finishes
- Duplex: HDG + zinc-rich primer + super-durable powder.
- Fasteners: stainless/HDG; isolate dissimilar contacts.
- Weeps in hollow members; drip edges on top caps.
Costs & what usually changes on retrofit day
- Hardware package (hinges, magnetic latch, back strike) is the big win—most passes happen here.
- Shielding strips are low-material, high-impact; they remove reach paths without changing the look.
- Foundation tweaks (rare) when posts are out of plumb; worth it if alignment drifts each season.
- Finish work protects cuts and keeps the look “new” at inspection time.
Maintenance & quick re-inspection drill
- Quarterly: Rinse hardware, then cycle the gate 10× from a small crack; listen for the click.
- Seasonal: Re-tension hinges after big temperature swings; re-check strike alignment.
- Annually: Verify under-gate reveal (pavers move), confirm the 18-in. shield is intact, touch up any nicks with zinc-rich primer + topcoat.